Windows 2012 Hosting - MVC 6 and SQL 2014 BLOG

Tutorial and Articles about Windows Hosting, SQL Hosting, MVC Hosting, and Silverlight Hosting

Cheap ASP.NET MVC 5.1.1 Hosting:: How to Integrated PayPal with ASP.NET MVC

clock June 9, 2014 11:26 by author Ben

This article discusses integration of PayPal payment gateway in asp.net MVC  web application. PayPal is an online payment service that allows you to pay for purchases, receive payments, or to send and receive money. To receive these services, a person must submit various financial details to PayPal, such as credit card number, transmission can be done by mail. Thereafter, transactions are conducted without having to disclose financial details, an email address and a password is sufficient.

We will look at a simple scenario of taking a user to a PayPal payment page to checkout.

1. Setting up the development tools

  • Creating a PayPal Account

You will need a sandbox account to test your transactions. The sandbox account is separate from a regular account and is all you need to sign up to before you develop and test your code.

  • PayPal Account Settings

It's good practice to put things like account settings in the web.config. The code in this article will access these settings. You must change the sandbox setting to False when using regular account details:

<appSettings>     
   <add key="PayPal:Sandbox" value="True" />
   <add key="PayPal:Username" value="*" />
   <add key="PayPal:Password" value="*" />
   <add key="PayPal:Signature" value="*" />
   <add key="PayPal:ReturnUrl" value="http://www.asphostportal.com" />
   <add key="PayPal:CancelUrl" value="http://www.asphostportal.com" />
</appSettings>


2. Creating the button
Now, you will have to create two Views in a Controller, one where you have the button and one where you have the validation mechanism. Let’s start with the button! Put the code below into any View. My View name is IPN in the User controller.
<!-- When you are done with all testing and want to change to the real PayPal, use following instead-->
<form action="https://www.paypal.com/cgi-bin/webscr" method="post">
<!-- end of Real PayPal example-->
 
<form action="https://www.sandbox.paypal.com/cgi-bin/webscr" method="post">
    <fieldset>
        <input class="full-width" type="hidden" name="business" value="<!--enter the Business account email here-->">
        <input type="hidden" name="cmd" value="_xclick">
        <input type="hidden" name="item_name" value="The unlimited music download subscription">
        <input type="hidden" name="amount" value="9">
        <input type="hidden" name="no_shipping" value="1">
        <input type=hidden name=RETURNURL
               value="http://example.com/User/IPN">
        <input type="hidden" name="return" value="http://example.com/User/IPN">
        <input type="hidden" name="notify_url" value="http://example.com/User/IPN">
 
        <button type="submit">Order now!</button>
    </fieldset>
</form>


3. Processing the information returned by PayPal

The example code is based on this code. Please take a look at it to see how it is done with several variables.

Now you need to create a new View in the controller, called IPN. Insert the following code:
public ActionResult IPN()
{
 
    var order = new Order(); // this is something I have defined in order to save the order in the database
 
    // Receive IPN request from PayPal and parse all the variables returned
    var formVals = new Dictionary<string, string>();
    formVals.Add("cmd", "_notify-synch"); //notify-synch_notify-validate
    formVals.Add("at", "this is a long token found in Buyers account"); // this has to be adjusted
    formVals.Add("tx", Request["tx"]);
 
    // if you want to use the PayPal sandbox change this from false to true
    string response = GetPayPalResponse(formVals, false);
 
    if (response.Contains("SUCCESS"))
    {
        string transactionID = GetPDTValue(response, "txn_id"); // txn_id //d
        string sAmountPaid = GetPDTValue(response,"mc_gross"); // d
        string deviceID = GetPDTValue(response, "custom"); // d
        string payerEmail = GetPDTValue(response,"payer_email"); // d
        string Item = GetPDTValue(response,"item_name");
 
        //validate the order
        Decimal amountPaid = 0;
        Decimal.TryParse(sAmountPaid, System.Globalization.NumberStyles.Number, System.Globalization.CultureInfo.InvariantCulture, out amountPaid);
 
        if (amountPaid == 9 )  // you might want to have a bigger than or equal to sign here!
        {
            if (orders.Count(d => d.PayPalOrderRef == transactionID) < 1)
            {
                //if the transactionID is not found in the database, add it
                //then, add the additional features to the user account
            }
            else
            {
                //if we are here, the user must have already used the transaction ID for an account
                //you might want to show the details of the order, but do not upgrade it!
            }
            // take the information returned and store this into a subscription table
            // this is where you would update your database with the details of the tran
 
            //return View();
 
        }
        else
        {
            // let fail - this is the IPN so there is no viewer
            // you may want to log something here
            order.Comments = "User did not pay the right ammount.";
 
            // since the user did not pay the right amount, we still want to log that for future reference.
 
            _db.Orders.Add(order); // order is your new Order
            _db.SaveChanges();
        }
 
    }
    else
    {
        //error
    }
    return View();
}
 
string GetPayPalResponse(Dictionary<string, string> formVals, bool useSandbox)
{
 
    string paypalUrl = useSandbox ? "https://www.sandbox.paypal.com/cgi-bin/webscr"
        : "https://www.paypal.com/cgi-bin/webscr";
 
    HttpWebRequest req = (HttpWebRequest)WebRequest.Create(paypalUrl);
 
    // Set values for the request back
    req.Method = "POST";
    req.ContentType = "application/x-www-form-urlencoded";
 
    byte[] param = Request.BinaryRead(Request.ContentLength);
    string strRequest = Encoding.ASCII.GetString(param);
 
    StringBuilder sb = new StringBuilder();
    sb.Append(strRequest);
 
    foreach (string key in formVals.Keys)
    {
        sb.AppendFormat("&{0}={1}", key, formVals[key]);
    }
    strRequest += sb.ToString();
    req.ContentLength = strRequest.Length;
 
    //for proxy
    //WebProxy proxy = new WebProxy(new Uri("http://urlort#");
    //req.Proxy = proxy;
    //Send the request to PayPal and get the response
    string response = "";
    using (StreamWriter streamOut = new StreamWriter(req.GetRequestStream(), System.Text.Encoding.ASCII))
    {
 
        streamOut.Write(strRequest);
        streamOut.Close();
        using (StreamReader streamIn = new StreamReader(req.GetResponse().GetResponseStream()))
        {
            response = streamIn.ReadToEnd();
        }
    }
 
    return response;
}
string GetPDTValue(string pdt, string key)
{
 
    string[] keys = pdt.Split('\n');
    string thisVal = "";
    string thisKey = "";
    foreach (string s in keys)
    {
        string[] bits = s.Split('=');
        if (bits.Length > 1)
        {
            thisVal = bits[1];
            thisKey = bits[0];
            if (thisKey.Equals(key, StringComparison.InvariantCultureIgnoreCase))
                break;
        }
    }
    return thisVal;
 
}


Please note down the Activation token found in the Buyers account in Profile>My Selling Tools>Website preferences> Update. Then, enable auto return and payment data transfer. There, you will also find the Activation token which you should add to:
formVals.Add("at", "this is a long token found in Buyers account");


Why you should choose ASPHostPortal.com for your Cheap ASP.NET MVC 5.1.1 Hosting?

  1. Daily Backup Service

    We realise that your website is very important to your business and hence, we never ever forget to create a daily backup. Your database and website are backup every night into a permanent remote tape drive to ensure that they are always safe and secure. The backup is always ready and available anytime you need it.

  2. Experts in ASP.NET MVC 5.1.1 Hosting

    Given the scale of our environment, we have recruited and developed some of the best talent in the hosting technology that you are using. Our team is strong because of the experience and talents of the individuals who make up ASPHostPortal.com

  3. Excellent Uptime Rate

    Our key strength in delivering the service to you is to maintain our server uptime rate. We never ever happy to see your site goes down and we truly understand that it will hurt your onlines business. If your service is down, it will certainly become our pain and we will certainly look for the right pill to kill the pain ASAP.

  4. 24/7-based Support

    We never fall asleep and we run a service that is operating 24/7 a year. Even everyone is on holiday during Easter or Christmas/New Year, we are always behind our desk serving our customers.

  5. Advanced Technology

    ASPHostPortal.com provides various editions of the important ASP.NET MVC frameworks, including basic ASP.NET MVC, ASP.NET MVC 2, ASP.NET MVC 3, ASP.NET MVC 4, ASP.NET MVC 5, ASP.NET MVC 5.1 and the latest ASP.NET MVC 5.1.1 . All of these frameworks enable customers to have a high level of flexibility and avoid compatible issue.


ASPHostPortal Web Hosting Announces Release of New Free 7 Days ASP.NET MVC 5.2 Hosting

clock June 6, 2014 07:56 by author Ben

Windows and ASP.NET hosting specialist, ASPHostPortal.com, has announced the availability of new hosting plans that are optimized for the latest update of the ASP.NET MVC  technology. The ASP.NET MVC 5.2 Release Candidate is now available to developers for immediate download. ASP.NET MVC 5.2 is the latest update to Microsoft's popular MVC (Model-View-Controller) technology - an established web application framework. This package contains the runtime assemblies for ASP.NET MVC. ASP.NET MVC gives you a powerful, patterns-based way to build dynamic websites that enables a clean separation of concerns and that gives you full control over markup. ASP.NET MVC 5.2  brings bootstrap into the default MVC template, authentication filters, filter overrides and attribute routing.  Attribute Routing on ASP.NET MVC 5.2 now provides an extensibility point called IDirectRouteProvider, which allows full control over how attribute routes are discovered and configured.

ASPHostPortal.com - a cheap, constant uptime, excellent customer service, quality and also reliable hosting provider in advanced Windows and ASP NET technology. ASPHostPortal.com hosts its servers in top class data centers that is located in United States to guarantee 99.9% network uptime. All data center feature redundancies in network connectivity, power, HVAC, security, and fire suppression. All hosting plans from ASPHostPortal.com include 24×7 support and 30 days money back guarantee.

“We pride ourselves on offering the most up to date Microsoft services. We're pleased to launch this product today on our hosting environment” said Dean Thomas, Manager at ASPHostPortal.com. “We have always had a great appreciation for the products that Microsoft offers. With the launched of ASP.NET MVC 5.2 hosting services, we hope that developers and our existing clients can try this new features. Now, you don’t need to spend a lot of money to get ASP.NET MVC 5.2 hosting.”

For more information about new ASP.NET MVC 5.2, please visit http://asphostportal.com/ASPNET-MVC-52-Hosting.

As a leading hosting provider, ASPHostPortal.com offers a comprehensive range of services including domain name registrations, servers, online backup solutions and dedicated web hosting. ASPHostPortal.com is well placed to deliver a high quality service.

About ASPHostPortal.com:

ASPHostPortal.com is a hosting company that best support in Windows and ASP.NET-based hosting. Services include shared hosting, reseller hosting, and sharepoint hosting, with specialty in ASP.NET, SQL Server, and architecting highly scalable solutions. As a leading small to mid-sized business web hosting provider, ASPHostPortal.com strive to offer the most technologically advanced hosting solutions available to all customers across the world. Security, reliability, and performance are at the core of hosting operations to ensure each site and/or application hosted is highly secured and performs at optimum level.


Cheap Windows Hosting Based in USA:: How to Fix SQL Injection Vulnerabilities in ASP.NET

clock June 5, 2014 07:07 by author Ben

Simply stated, SQL injection vulnerabilities are caused by software applications that accept data from an untrusted source (internet users), fail to properly validate and sanitize the data, and subsequently use that data to dynamically construct an SQL query to the database backing that application. For example, imagine a simple application that takes inputs of a username and password. It may ultimately process this input in an SQL statement of the form

string query = "SELECT * FROM users WHERE username = "'" + username + "' AND password = '" + password + "'";

Since this query is constructed by concatenating an input string directly from the user, the query behaves correctly only if password does not contain a single-quote character.

Impact of SQL Injection vulnerabilities

  • Reading, Updating and Deleting arbitrary data from the database
  • Executing commands on the underlying operating system
  • Reading, Updating and Deleting arbitrary tables from the database

There are many way finding SQL Injection Vulnerabilities manually. But, in this article, I will show you how to find SQL Injection Vulnerabilities automatically. It’s no different than finding it manually. The process mainly involves three tasks :

  • Identifying Data Entry.
  • Inject Data to Database.
  • And last, detect anomalies from it’s response

you will see that you can do it automatically to a certain process. Identifying data entry (1st step) is something that can be automated. You can do it by just crawl the website and finding GET and POST request. As well ass Data Injection (2nd step), can also be done in an automatic fashion. The main problem is the 3rd step ( Detect Anomalies Response of Remote Server ). Although this part is easy for human to detect. it sometimes very difficult for a bot or software to detect it and fully understand output of the remote server. For example, when the web application returns the SQL error from database or when the web application returns HTTP 500 code error.

How to Fix SQL Injection Vulnerabilities in ASP.NET

c# code:

string queryText = "SELECT * FROM Students WHERE City=@City";
SqlCommand cmd = new SqlCommand(queryText, conn);
cmd.Parameters.Add("@City",City);
SqlDataAdapter da = new SqlDataAdapter(cmd);
DataSet ds = new DataSet();
da.Fill(ds);
return ds;


ASP.NET code:

/*C# code*/
string commandText = "SELECT * FROM Customers WHERE Country=@CountryName";
SqlCommand cmd = new SqlCommand(commandText, conn);
cmd.Parameters.Add("@CountryName",countryName);


Stored Procedure:

var connect = ConfigurationManager.ConnectionStrings["NorthWind"].ToString();
var query = "GetProductByID";
using (var conn = new SqlConnection(connect))
{
  using (var cmd = new SqlCommand(query, conn))
  {
    cmd.CommandType = CommandType.StoredProcedure;
    cmd.Parameters.Add("@ProductID", SqlDbType.Int).Value = Convert.ToInt32(Request["ProductID"]);
    conn.Open();
    //Process results
  }
}


Fixing the SQL Injection Vulnerabilities would not be enough to protect your web application. You need to protect it using Runtime Protection.

Cheap SQL Hosting with ASPHostPortal.com
Providing the best security, compliance, performance, and managed service separates ASPHostPortal.com from other hosting companies. MS SQL server supports our commitment to providing service options the businesses that choose ASPHostPortal.com demand. Use the Promo Code "DBSQL" (without quotes) and receive double SQL Server Space!


Plesk 12 on Windows Hosting with ASPHostPortal.com :: WordPress Toolkit in Parallel Plesk 12

clock June 4, 2014 11:49 by author Kenny

WordPress Toolkit in Parallel Plesk 12 has been released recently. Many advantages that very useful in the new WordPress Toolkit in Parallel Plesk 12. You can feel the big difference things when you try to use WordPress Toolkit in Parallel Plesk 12.

Why we must talking about WordPress? Yeah, because there are over 77.2 million WordPress sites worldwide. Because WordPress dominates the CMS industry with over 60% market share. WordPress is open source and extremely popular (it's making it a prime target for malicious hackers). Many Hosters have more orphaned & insecure WordPress installations running on their network than they have WordPress installations that secure & up-to-date. The WordPress Toolkit is designed to help Hosters Toolkit is designed to help Hosters manage the growing use of WordPress on their network. And many more topics for talking about this popular CMS.

Now WordPress and the latest Parallel Plesk 12 launches WordPress Toolkit. WordPress Toolkit in Parallel Plesk 12 has many benefits like:

  • Detect rogue & out-of-date WordPress installations on your server before they get hacked
  • Easily update/upgrade/harden any WordPress installation on any site
  • Get notified when new plugin & theme updates are available

Good news for Hosters, WordPress Toolkit is included in the Plesk 12 Web Host & Web Pro Editions. The first for Hosters is The Web Host Edition, it is perfect for Shared Hosters who often don’t manage what their customers can install. The WordPress Toolkit was designed to help their support staff detect, update, & harden WordPress installations across all sites on their server(s). And for Pro there is The Web Pro Edition, it is perfect for Agencies & Web Pros who mostly manage WordPress installations for their customers. You’re now equipping them with the key tool they need to more efficiently manage and secure their customers’ WordPress sites!

Parallel Plesk 12 is a lot better that the previous version. It has responsive UI for account management on any mobile device, new WordPress mass-management & security tools and improved server-to-site security out-of-the-box.

So, are you feel that the new WordPress Toolkit in Parallel Plesk 12 good? It is good idea for try the new innovation that makes you will be better.


Shopping Cart .NET Hosting - Why You Should use Shopping Cart.NET For Your Ecommerce Site?

clock June 3, 2014 06:18 by author Ben

Shopping Cart .NET is a complete E Commerce portal written in ASP.NET. It offers CMS features such as customized pages, themes and navigation menu. ShoppingCart.NET allows you to easily build a full ecommerce site with a shopping cart. You can create an online store with full control over all your pages, the design and product catalog. And best of all - there is no programming skills required.

The commerce features include a complete shopping cart complete with custom images, view history, product reviews, coupons and discounts, subscription and downloadable products, Gift registry, customer control panel and store owner admin panel. Included is also Authorize.Net Advanced Integration Method (AIM), Paypal Pro and Google Checkout API. Beside that the key features of Shopping Cart. NET are :

  • Content Management - Once you have specified your design you can simply enter your products, services, descriptions, images and information about your business. The easy to use editor will help you format copy, and the Shopping Cart software will automatically re-size your product images to the required format.
  • Integration with PayPal - Shopping Cart’s Integration with PayPal’s Express Checkout allows you to quickly and easily accept payments in a number of different currencies. It also allows your customers to make credit card and electronic payments online conveniently and securely.
  • WCF Support - WCF AJAX services for view history and inventory have been replaced with generic handlers and JSON.NET.
  • Store setup - Store setup is now a breeze with the three familiar screens replaced with one and more default settings are pre filled. Just select an admin user name, email and password and you are go to go.
  • Admin menu - Admin menu is new and is now a part of the master admin page for easy navigation.
  • Simple database schema - Membership, roles and profile providers have been replaced with the providers in System.Web.Providers and are now using a simplified database schema.

The Shopping Cart .NET ecommerce platform scales as your online business grows, allowing you to add additional functionality and ecommerce websites as needed.

What Makes Us Special on Shopping Cart .NET Hosting on our Servers:

We strive towards affordable solutions
For as the company grows, as well as benefiting from our increasing experience and expertise, the customer is rewarded through our rates – always affordable and value for money.

Your website is in safe hands
Four year experience in the business has helped us refine our skills, services and products providing sustainable and all round reliableweb-hosting solutions.

Setup
One click installation of Shopping Cart .NET to guarantee the best quality and compatibility.

Service
We provide FREE and professional 24/7 Shopping Cart .NET Hosting Support. Our Technical Support team has helped setup innumerable.


Looking For Cheap and Best YetAnotherForum Hosting?

clock May 30, 2014 07:58 by author Ben

ASPHostPortal windows hosting is compatible with the YetAnotherForum.NET. We offer YetAnotherForum.NET based hosting plan from just $5/month (see our YetAnotherForum.NET Hosting Plan).

The ASPHostPortal.com ASP.NET hosting platform is compatible with YetAnotherForum (YAF) Forum application. YetAnotherForum.NET (YAF) is a Open Source discussion forum or bulletin board system for web sites running ASP.NET.
It is 100% written in C#, YAF is a combination of Open Source, Microsoft's .NET platform and an international collaboration of the .NET developer community. ASP.NET forum solutions are not so much on the market and YAF is absolutely the best solution.

The YAF project is lead by Jaben Cargman of Tiny Gecko and grows and changes daily. YAF runs on any hosting server that's configured with Asp.net 2.0+ and SQL Server service. Some key features for YetAnotherForum:

  • Licensed under GPL
  • Web Based Administration
  • Unlimited number of boards forums and categories
  • Template-based design
  • Unicode (UTF-8) encoding
  • DotNetNuke, Umbraco, MojoPortal Modules

YAF is actually a simple support by ASPHostPortal ASP.NET hosting service. Besides YAF, ASPHostPortal.com is golden partner over lots of asp.net projects. By powering thousands of popular .net web applications, ASPHostPortal.com is official recommendation for such softwares.

You can get YetAnotherForum.NET CMS Hosting installed with a click of a mouse at ASPHostPortal.com. Here are 5 reasons why we are the best:

Easy to Use Tools - ASPHostPortal.com use World Class Plesk Control Panel that help you with single-click YetAnotherForum.NET CMS installation.
Best Server Technology - The minimal specs of our servers includes Intel Xeon Dual Core Processor, RAID-10 protected hard disk space with minimum 8 GB RAM. You dont need to worry about the speed of your site.
Best Programming Support - ASPHostPortal.com hosting servers come ready with the latest PHP version. You can get access directly to your MySQL from our world class Plesk Control Panel.
Best and Friendly Support - Our customer support will help you 24 hours a day, 7 days a week and 365 days a year to assist you.
Uptime & Support Guarantees - We are so confident in our hosting services we will not only provide you with a 30 days money back guarantee, but also we give you a 99.9% uptime guarantee.


WCF Hosting with ASPHostPortal.com :: How to Secure WCF Service on IIS

clock May 21, 2014 13:24 by author Kenny

In this article i will explain about how to secure WCF Service on IIS. That is typically an easy requirement but I had a couple of restrictions:

- Only BasicHttpBinding could be used on the client-side
- Client credentials (username / password) must be sent and validated with each request


Windows Communication Foundation (WCF) is a framework for building service-oriented applications. Using WCF, you can send data as asynchronous messages from one service endpoint to another. A service endpoint can be part of a continuously available service hosted by IIS, or it can be a service hosted in an application. An endpoint can be a client of a service that requests data from a service endpoint. The messages can be as simple as a single character or word sent as XML, or as complex as a stream of binary data.

One option is to send and validate the credentials as parameters to each method. This method is usually seen as unacceptable because credentials are passed across the service as plain-text. Do you want your password sent over a web service as plain-text?

After doing some research, I came up with a solution that is largely a combination of two sources: configuring a WCF service on IIS with SSL and username authentication over BasicHttpBinding… I’ll do my best to consolidate both of those sources for simplicity.

Programming / Configuring the WCF Service
1. Open Visual Studio.
2. Create a new ‘WCF Service Application’ project.
3. Define a service interface:

using System.ServiceModel;
namespace Brett.Service
{
    [ServiceContract]
    public interface IService1
    {
        [OperationContract]
        string GetData(int value);
    }
}


4. Implement your service interface. Our  GetData method will return a string that shows the authenticated username and the integer value passed. If the current identity is not authenticated, we throw an exception (this is not our validation method, that is shown shortly):
using System;
using System.ServiceModel;
namespace Brett.Service
{
    public class Service1 : IService1
    {
        public string GetData(int value)
        {
            return string.Format("{0} entered: {1}", GetCurrentUserName(), value);
        }
        private string GetCurrentUserName()
        {
            var primaryIdentity = ServiceSecurityContext.Current.PrimaryIdentity;
            if (primaryIdentity.IsAuthenticated)
            {
                return primaryIdentity.Name;
            }
            else
            {
                throw new Exception(@"User is not authenticated...");
            }
        }
    }
}

5. Implement a custom credential validator. The class needs to extend the abstract class UserNamePasswordValidator . The important implementation detail here is that you want to throw a FaultException  if the credentials are incorrect:
using System.IdentityModel.Selectors;
using System.ServiceModel;
namespace Brett.Service
{
    public class CustomValidator : UserNamePasswordValidator
    {
        public override void Validate(string userName, string password)
        {
            if (userName != @"hello")
            {
                throw new FaultException(@"User name must be 'hello'.");
            }
        }
    }
}


6. Edit your web config file. This is probably the most tedious portion of the process. I’ll go ahead and attach the whole file here:
<?xml version="1.0"?>
<configuration>
  <system.web>
    <compilation debug="true" targetFramework="4.0" />
  </system.web>
  <system.serviceModel>
    <services>
      <service name="Brett.Service.Service1"
               behaviorConfiguration="Brett_Behavior">
        <endpoint address=""
                  binding="basicHttpBinding"
                  bindingConfiguration="Brett_BindingConfiguration"
                  contract="Brett.Service.IService1" />
        <endpoint address="mex"
                  binding="mexHttpsBinding"
                  contract="IMetadataExchange" />
      </service>
    </services>
    <bindings>
      <basicHttpBinding>
        <binding name="Brett_BindingConfiguration">
          <security mode="TransportWithMessageCredential">
            <message clientCredentialType="UserName" />
          </security>
        </binding>
      </basicHttpBinding>
    </bindings>
    <behaviors>
      <serviceBehaviors>
        <behavior name="Brett_Behavior">
          <serviceMetadata httpsGetEnabled="true" />
          <serviceDebug includeExceptionDetailInFaults="true"/>
          <serviceCredentials>
            <userNameAuthentication userNamePasswordValidationMode="Custom"
                                    customUserNamePasswordValidatorType="Brett.Service.CustomValidator,
Brett.Service"/>
          </serviceCredentials>
        </behavior>
      </serviceBehaviors>
    </behaviors>
    <serviceHostingEnvironment multipleSiteBindingsEnabled="true" />
  </system.serviceModel>
  <system.webServer>
    <modules runAllManagedModulesForAllRequests="true" />
  </system.webServer>
</configuration>


Some important things to note here… We expose two endpoints – one for the BasicHttpBinding and one for service metadata (mex). We are using BasicHttpBinding  withTransportWithMessageCredential  security (that further specifies a message credential type ofUserName ). The service credentials point to our CustomValidator . This is the absolute minimum needed for me to get the web service working – all elements were needed.

7. Publish the project somewhere local on your machine (right-click project, publish).

Configuring IIS for WCF Service with SSL
1. Follow instructions in this guide, until you reach ‘Configure WCF Service for HTTP Transport Security’ (don’t do that part). I would list these out myself, but I think the visuals provided in the link are very helpful.
2. I ended up having some file access issues with my application pool, so I ended up making my application pool run as an administrator identity.

Programming / Configuring the WCF Client
1. Open Visual Studio.
2. Create a new ‘Windows Console Application’ project.
3. Add a new service reference – use the location of your WCF Service that is hosted with IIS. The metadata for the service has been downloaded and an app.config file has been produced. We won’t use the app.config.

Program the console application to make a call to the service:
using Brett.Client.ServiceReference1;
using System;
using System.ServiceModel;
using System.ServiceModel.Description;
namespace Brett.Client
{
    class Program
    {
        static void Main(string[] args)
        {
            var binding = new BasicHttpBinding(BasicHttpSecurityMode.TransportWithMessageCredential);
            var endpointAddress = new
EndpointAddress(@"https://localhost/WhateverYouNamedThis/Service1.svc");
            using (var service = new Service1Client(binding, endpointAddress))
            {
                var loginCredentials = new ClientCredentials();
                loginCredentials.UserName.UserName = @"hello";
                loginCredentials.UserName.Password = @"brett's password";
                var defaultCredentials = service.Endpoint.Behaviors.Find<ClientCredentials>();
                service.Endpoint.Behaviors.Remove(defaultCredentials); //remove default ones
                service.Endpoint.Behaviors.Add(loginCredentials); //add required ones
                var data = service.GetData(100);
                Console.WriteLine(data);
                Console.ReadLine();
            }
        }
    }
}


Best ASP.NET 4.5.2 Hosting with ASPHostPortal.com:: New Features of ASP.NET 4.5.2

clock May 16, 2014 07:56 by author Ben


Finally, the long awaited release of ASP.NET 4.5.2, ASPHostPortal are happy to announce the availability of the .NET Framework 4.5.2 for all our hosting packages. It is a highly compatible, in-place update to the .NET Framework 4, 4.5 and 4.5.1.

The Microsoft .NET Framework 4.5.2 is a highly compatible, in-place update to the Microsoft .NET Framework 4, Microsoft .NET Framework 4.5 and Microsoft .NET Framework 4.5.1.

The .NET Framework 4.5.2 Preview is the first update of .NET Framework 4.5. It contains critical fixes, improvements, and opt-in features and is part of the Visual Studio 2013 and Windows 8.1 Previews. But it is also available as direct download without the requirement of having an existing .NET Framework 4.5 installation.

The .NET 4.5.2 Preview Framework update provides some fixes and multiple performance enhancements. There are no major language features, but nonetheless those upgrades become very handy and will allow for a more seamless and productive software development experience.

The .NET Framework 4.5.2 contains a variety of new features, such as:

  • ASP.NET improvements
  • High DPI Improvements - As part of recently released .NET 4.5.2, Windows Forms is seeing some improvements for its high DPI support.
  • Distributed transactions enhancement - This service provides applications with a way to support transactions that span multiple processes or even multiple machines.
  • More robust profiling
  • Improved activity tracing support in runtime and framework - The .NET Framework 4.5.2 enables out-of-process, Event Tracing for Windows (ETW)-based activity tracing for a larger surface area.
  • Event tracing changes - The ASP.NET Framework 4.5.2 enables out-of-process, Event Tracing for Windows (ETW)-based activity tracing for a larger surface area. This enables Advanced Power Management (APM) vendors to provide lightweight tools that accurately track the costs of individual requests and activities that cross threads.

Unique ASP.NET 4.5.2 Hosting Performance on our Shared Servers:

Build Your Website
Use ASPHostPortal.com's website building tools to get that special, customized look for your website. A nifty wizard will walk you through the process.
All-inclusive prices unbeatable value
Other companies promise cheap hosting, but then charge extra for setup fees, higher renewal rates, or promotional services. With ASPHostPortal.com, the listed price is the number you’ll pay, and you can expect a fully loaded, comprehensive suite of web services.
Fast and Secure Server

Our powerfull servers are especially optimized and ensure the best ASP.NET 4.5.2 performance. We have best data centers on three continent and unique account isolation for security.
Easy to Use and ManageASPHostPortal.com webspace explorer lets you manage your website files with a browser. A control panel lets you set up and control your server functions with ease.


Crystal Report Hosting:: How to Integrate Crystal Report in ASP.NET MVC 4.0

clock May 14, 2014 08:20 by author Ben

Crystal Reports has been the king of the reporting hill for some time. It offers the most powerful features of any report writer. And ASP.NET MVC 4.0 is a framework for building scalable, standards-based web applications using well-established design patterns and the power of ASP.NET and the .NET Framework.In this article I will give tutorial how to integrate Crystal Report in ASP.NET MVC 4.0.
Prerequisite:

  • .Net framework 4.0
  • Entity Framework
  • Sql Server 2008


Just follow the steps and get result easily:
Step 1 - Create New Project
Go to File > New > Project > Select asp.net mvc4 web application > Entry Application Name > Click OK.

Step 2 - Add a Database.
Go to Solution Explorer > Right Click on App_Data folder > Add > New item > Select SQL Server Database Under Data > Enter Database name > Add.

Step 3 - Create table and insert data for show in report
Open Database > Right Click on Table > Add New Table > Add Columns > Save > Enter table name > Ok.

Step 4 - Add Entity Data Model.
Go to Solution Explorer > Right Click on Project name form Solution Explorer > Add > New item > Select ADO.net Entity Data Model under data > Enter model name > Add.
A popup window will come (Entity Data Model Wizard) > Select Generate from database > Next >
Chose your data connection > select your database > next > Select tables > enter Model Namespace > Finish.

Step 5 Add Action for populate data.
Go To Controller > Add your action > write following code and Rebuild your application to get data from Database.
public ActionResult ReportsEverest()
{
List<everest> allEverest = new List<everest>();
using (MyDatabaseEntities dc = new MyDatabaseEntities())
{
allEverest = dc.Everests.ToList();
}
return View(allEverest);
}
</everest></everest>


Step 6 - Add View for show data on page.
Right Click on your Action > Add View > Enter View name > Check Create a strongly-type view > Select your model class > Select Scaffold templete > Select list > Add.
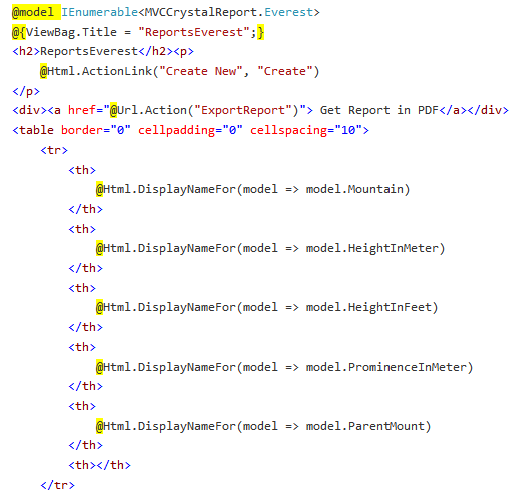
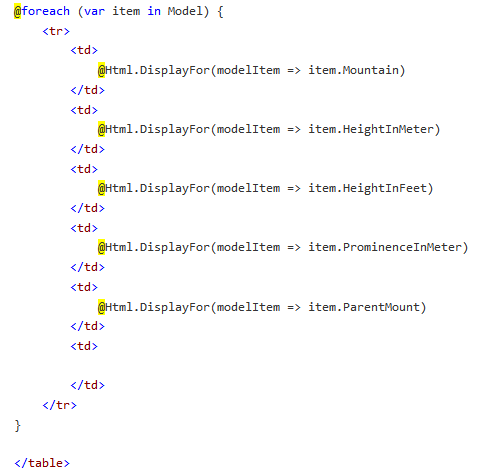
Run Your Application. And look the result,show in your browser.
Here I have added below line for Get Exported PDF File.
<a href="@Url.Action("ExportReport")"> Get Report in PDF</a>

Step 7 - Add Report file(.rpt) and Design your report.
Add "Reports" folder to your project
Right Click on "Reports" folder > Add > New item > Select Report under Reporing (Crystal Report file) > Enter report file name > Add.
Right Click On "Database Fields" under Fields Explorer > Database Expert > Project Data > .NET Objects > Select your Object > Click on simble ">>" > Ok.
Now Design your Report looks.


Step 8 - Add Action for generate PDF File for Report Data
Go To Controller > Add your action > write following code and Rebuild your application to get data from Database.

public ActionResult ExportReport()

        {

            List<everest> allEverest = new List<everest>();

            using (MyDatabaseEntities dc = new MyDatabaseEntities())

            {

                allEverest = dc.Everests.ToList();

            }

            ReportDocument rd = new ReportDocument();

            rd.Load(Path.Combine(Server.MapPath("~/Reports"), "rpt_EverestList.rpt"));

            rd.SetDataSource(allEverest);

            Response.Buffer = false;

            Response.ClearContent();

            Response.ClearHeaders();

            try

            {

                Stream stream = rd.ExportToStream(CrystalDecisions.Shared.ExportFormatType.PortableDocFormat);

                stream.Seek(0, SeekOrigin.Begin);

                return File(stream, "application/pdf", "EverestList.pdf");

            }

            catch (Exception ex)

            {

                throw;

            }

        }

Step 10 - Run ApplicationClick on links "Get Report in PDF" and get your report in PDF format.

Best Crystal Reports Hosting with ASPHostPortal.com

ASPHostPortal.com provides you with the technology to drive business performance with advanced reports generation capabilities of the Crystal Reports Hosting. The interactive reports generated by the software maximizes the reporting power of your business. These reports are delivered via Web, email, Microsoft Office applications or Adobe PDF, or as embedded enterprise applications. The interactive dashboards and simplified charts present the data in crystal clear form. With all these features, hosting with Crystal Reports helps you minimize the IT expenditure.


Windows Server 2012 Hosting:: Installing Hyper-V on Windows Server 2012

clock May 7, 2014 09:29 by author Ben

When installing Windows Server 2012, it matters if you have the retail version of Windows Server 2012 setup media or the volume license version. The retail version of Windows Server 2012 requires a product key to proceed. The volume license edition does not require a product key at installation time.

There are a few new features available in Windows Server 2012 Hyper-V, the most interesting are:

  • Hyper-V Virtual Machine (VM) Replication, a new disaster recover (DR) mechanism for VMs.
  • Virtual SAN Manager and the ability to deploy virtual fiber channel adapters to VMs.
  • New virtual hard drive (VHD) format ".vhdx" offers superior performance, capacity, and reliability over Hyper-V VHDs in Windows Server 2008.
  • Ability to Live Migrate VMs between hosts that are not in a cluster and have no shared storage.

Once you have verified and you are sure that the target computer system has all the prerequisites in place, and it meets the minimum hardware requirements, here is how you can install the Hyper-V role on the Windows Server 2012 standalone computer or Active Directory domain controller:

  1. Log on to the computer with the Administrator account (in case of standalone server) or Enterprise Admin or Domain Admin account (in case of Active Directory domain controller).
  2. If not already started, initialize the Server Manager window by clicking its icon from the bottom left corner of the screen.
  3. On the opened Server Manager window, from the top right corner, go to the Manage menu from the menu bar.
  4. From the displayed list, click the Add Roles and Features option.
  5. On the opened Add Roles and Features Wizard box, on the Before you begin window, click Next to proceed to the next step.
  6. On the Select installation type window, make sure that the Role-based or feature-based installation radio button is selected.
  7. Click Next to proceed to the next step.
  8. On the Select destination server window, make sure that the Select a server from the server pool radio button is selected.
  9. Also make sure that the target server (this server) is selected in the Server Pool list.
  10. Click Next to continue.
  11. On the Select server roles window, check the Hyper-V checkbox, and on the displayed box, click the Add Features button to add the additional features that are essential for the Hyper-V role.
  12. Back on the Select server roles window, click Next to proceed.
  13. On the Select features window, leave the default settings intact and click Next.
  14. On the Hyper-V window, read the information carefully and click Next.
  15. On the Create Virtual Switches window, check the checkbox representing the active Ethernet card in the Network adapters list.
  16. Click Next to continue to the next step.
  17. On the Virtual Machine Migration window, leave everything default for now and click Next.
  18. On the Default Stores window, click the Browse button to change the default virtual hard disk and Hyper-V configuration files’ locations. (You can leave the default settings intact for the testing purposes, like it is in this demonstration.)
  19. On the Confirm installation selections window, check the Restart the destination server automatically if required checkbox.
  20. Finally click Install to begin the Hyper-V role installation process on the Windows Server 2012 server.
  21. Once the installation process completes, and the system restarts, you can start creating the Hyper-V virtual machines on the server.


Note: It is important to store the virtual hard disk files to any location other than C:\ in order to prevent the system drive from getting overpopulated and over consumed, which may further result in decreased Windows Server 2012 performance.

Take Your Business to Next Level with Windows Server 2012 Hosting
While Windows Server 2012 general availability starts September 4th, new and existing ASPHostPortal.com clients can now take advantage of the powerful capabilities of Microsoft’s latest edition. In keeping with ASPHostPortal.com’s commitment to offer the most advanced tools and resources as they become available, support for Windows Server 2012 hosting falls right in line by providing a full suite of added features and benefits.


About ASPHostPortal.com

We’re a company that works differently to most. Value is what we output and help our customers achieve, not how much money we put in the bank. It’s not because we are altruistic. It’s based on an even simpler principle. "Do good things, and good things will come to you".

Success for us is something that is continually experienced, not something that is reached. For us it is all about the experience – more than the journey. Life is a continual experience. We see the Internet as being an incredible amplifier to the experience of life for all of us. It can help humanity come together to explode in knowledge exploration and discussion. It is continual enlightenment of new ideas, experiences, and passions

 photo ahp banner aspnet-01_zps87l92lcl.png

Author Link

Corporate Address (Location)

ASPHostPortal
170 W 56th Street, Suite 121
New York, NY 10019
United States

Sign in