Crystal Reports has been the king of the reporting hill for some time. It offers the most powerful features of any report writer. And ASP.NET MVC 4.0 is a framework for building scalable, standards-based web applications using well-established design patterns and the power of ASP.NET and the .NET Framework.In this article I will give tutorial how to integrate Crystal Report in ASP.NET MVC 4.0.

Prerequisite:
- .Net framework 4.0
- Entity Framework
- Sql Server 2008
Just follow the steps and get result easily:
Step 1 - Create New Project
Go to File > New > Project > Select asp.net mvc4 web application > Entry Application Name > Click OK.
Step 2 - Add a Database.
Go to Solution Explorer > Right Click on App_Data folder > Add > New item > Select SQL Server Database Under Data > Enter Database name > Add.
Step 3 - Create table and insert data for show in report
Open Database > Right Click on Table > Add New Table > Add Columns > Save > Enter table name > Ok.
Step 4 - Add Entity Data Model.
Go to Solution Explorer > Right Click on Project name form Solution Explorer > Add > New item > Select ADO.net Entity Data Model under data > Enter model name > Add.
A popup window will come (Entity Data Model Wizard) > Select Generate from database > Next >
Chose your data connection > select your database > next > Select tables > enter Model Namespace > Finish.
Step 5 Add Action for populate data.
Go To Controller > Add your action > write following code and Rebuild your application to get data from Database.
public ActionResult ReportsEverest()
{
List<everest> allEverest = new List<everest>();
using (MyDatabaseEntities dc = new MyDatabaseEntities())
{
allEverest = dc.Everests.ToList();
}
return View(allEverest);
}
</everest></everest>
Step 6 - Add View for show data on page.
Right Click on your Action > Add View > Enter View name > Check Create a strongly-type view > Select your model class > Select Scaffold templete > Select list > Add.
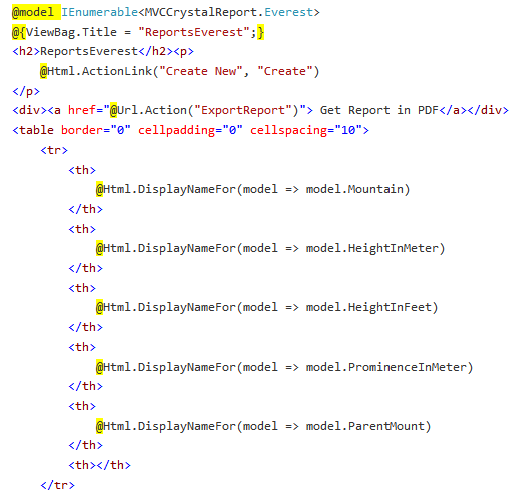
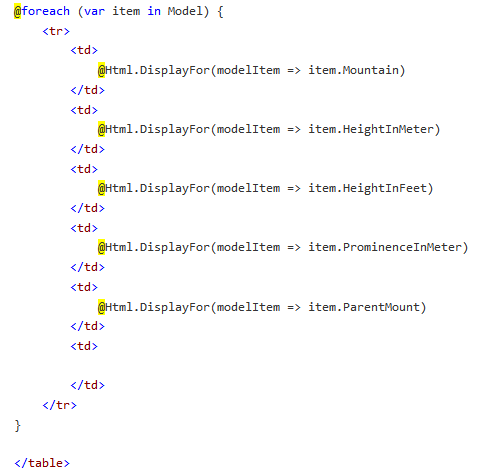
Run Your Application. And look the result,show in your browser.
Here I have added below line for Get Exported PDF File.
<a href="@Url.Action("ExportReport")"> Get Report in PDF</a>
Step 7 - Add Report file(.rpt) and Design your report.
Add "Reports" folder to your project
Right Click on "Reports" folder > Add > New item > Select Report under Reporing (Crystal Report file) > Enter report file name > Add.
Right Click On "Database Fields" under Fields Explorer > Database Expert > Project Data > .NET Objects > Select your Object > Click on simble ">>" > Ok.
Now Design your Report looks.
Step 8 - Add Action for generate PDF File for Report Data
Go To Controller > Add your action > write following code and Rebuild your application to get data from Database.
public ActionResult ExportReport()
{
List<everest> allEverest = new List<everest>();
using (MyDatabaseEntities dc = new MyDatabaseEntities())
{
allEverest = dc.Everests.ToList();
}
ReportDocument rd = new ReportDocument();
rd.Load(Path.Combine(Server.MapPath("~/Reports"), "rpt_EverestList.rpt"));
rd.SetDataSource(allEverest);
Response.Buffer = false;
Response.ClearContent();
Response.ClearHeaders();
try
{
Stream stream = rd.ExportToStream(CrystalDecisions.Shared.ExportFormatType.PortableDocFormat);
stream.Seek(0, SeekOrigin.Begin);
return File(stream, "application/pdf", "EverestList.pdf");
}
catch (Exception ex)
{
throw;
}
}
Step 10 - Run ApplicationClick on links "Get Report in PDF" and get your report in PDF format.
Best Crystal Reports Hosting with ASPHostPortal.com
ASPHostPortal.com provides you with the technology to drive business performance with advanced reports generation capabilities of the Crystal Reports Hosting. The interactive reports generated by the software maximizes the reporting power of your business. These reports are delivered via Web, email, Microsoft Office applications or Adobe PDF, or as embedded enterprise applications. The interactive dashboards and simplified charts present the data in crystal clear form. With all these features, hosting with Crystal Reports helps you minimize the IT expenditure.