Windows 2012 Hosting - MVC 6 and SQL 2014 BLOG

Tutorial and Articles about Windows Hosting, SQL Hosting, MVC Hosting, and Silverlight Hosting

ASP.NET Hosting - IIS 7.5 Hosting - ASPHostPortal.com :: Configure Costum Error in IIS 7.5 With ASP.NET

clock September 21, 2013 09:17 by author Ben

Now, I will explain how to configure custom error pages in IIS (Internet Information Service). For this example we will be using IIS 7.5 which shipped with Windows Server 2008 R2.

First Step, Open Internet Information Services (IIS) Manager.  Select your website. Note: This could also be set at the server level and applied to all sites on the server. DoubleClick on the “.NET Error Pages” icon.


The .NET Error Pages features view will be displayed.


Click the “Edit Feature Settings” link to enable this feature. The “Edit Error Page Settings” dialog box will appear.


How to determine the error code 404 explicitly..

First, On the .NET Error Pages Actions menu click the Add link.


The “Add Custom Error Page” dialog will appear. This is where we define individual error pages per status code. For our example we will add a custom page for the HTTP 404 Error.


Now that we have turned on the feature and added a custom page for the 404 status code we can verify it is working. Please reload your website.

As mentioned above this can also be managed from the site’s web.config file. Consider the following configuration section from our site’s web.config file.


Windows 2012 Hosting :: Introduction Dynamic Access Control 2012

clock September 2, 2013 12:09 by author Ben

Do you know what is Dynamic Access Control??
Microsoft Dynamic Access Control (DAC) is a data governance tool in Windows Server 2012 that lets administrators control access settings. DAC uses centralized policies to let administrators review who has access to individual files. Files can be manually or automatically classified.

Windows Server 2012 Dynamic Access Control basically organize information automatically on file servers in order to meet business needs and regulatory requirements .

With the use of technology in the DAC classification , organization or company can identify or provide " tags " or labels to files on the file server . This capability to control access to files that were tagged through centralized access policies , perform audits and related reporting events related to access or attempts to access , use RMS ( Rights Management Services ) to encrypt Office documents so that the documents safe when the data out of the file server .

A number of the features found in Windows Server 2012 that are beneficial to the administrator in this regard :

  •     File owner , or the owner can directly provide information " tags " or labels to their own information , so do not need to be done by the administrator .
  •     Apply to the central access policy files ( information ) that has been in the " tag " or label given
  •     Provide " access denied remediation " when the user can not access the information .
  •     Configure the central audit trail records policies for information access ( access logs ) that can later be used for analysis and forensic needs .
  •     Protect certain sensitive information to the protection of the RMS automatically.


Label or tag used to identify the protected file can be used to classify files in logic . In Windows Server 2012 , this label can be applied in four ways :

  •     Based on location . When files are stored on a file server , the file inherits the label of its parent folder .
  •     Manually . Users and administrators can manually file labeling .
  •     Automatic . Files can be automatically labeled based on content or other characteristics .
  •     With the application , using the API for labeling file maintained by the application .


ASP.NET MVC 4 Hosting - ASPHostPortal :: Build Mobile Applications With ASP.NET MVC 4.5

clock August 20, 2013 05:56 by author Ben

The MVC 4 release is building on a pretty mature base and is able to focus on some more advanced scenarios. Some top features include:

  • ASP.NET Web API
  • Enhancements to default project templates
  • Mobile project template using jQuery Mobile
  • Display Modes
  • Task support for Asynchronous Controllers
  • Bundling and minification

The following sections provide an overview of these features. We’ll be going into them in more detail throughout the book.
Developing MVC 4 applications with Visual Studio 2011 Developers Preview is quite jump-start for developers as it has inbuilt support for JQuery Mobile css & javascripts, nice intellisense for HTML 5 , CSS 3 media queries. MVC 4 developers preview was built keeping in mind the Mobile Web Developers who wants keen support of rich MVC in Mobile Web.

  • Lets start to develop MVC 4 mobile application with JQuery Mobile, HTML5, CSS3 in VS 2011 developers preview.

  • Select your MVC 4 application domain either Internet/Intranet/Mobile Web application  with default Razor or ASPX syntaxes. For my demo , selected Mobile Web application in VS 2011 Developer Preview.

  • Next, write some JQuery Mobile application code to check th UI view in SmartPhones while Model & Controller logic remains same & could change according to business requirements.
  • Database -> Entity Framework (EF) -> Model in MVC 4(Entities) (DAL)-> Controllers (Business Logic Layer)(BLL) -> View(s) -> Master(_Layout.cshtml) is the default development path in MVC 4 Web & mobile application.

  • Next , Check the nice intellisense support for HTML5 , JQuery Mobile in Visual Studio 2011 Developer Preview.

  • Check out the MVC 4 Mobile Web applications with JQuery Mobile , HTML5 , CSS 3 media queries in Smart Devices.
  • JQuery Mobile View in iPhone of MVC 4 Mobile application:


WebMatrix Hosting :: SEO Report In Microsoft WebMatrix

clock July 31, 2013 09:06 by author Ben

WebMatrix was built to streamline Web development and make it easy, whether you're getting started or you just want to get things done. It lets you focus on what’s important — your Web site.

SEO (Search Engine Optimization) is the effort to the make your website on the first position on the search engines like google, yahoo, bing, etc.


WebMatrix SEO Report feature that has Allows you to check the web script so that you can order search engine optimization friendly. In the example I was trying to make a simple script report.

Open Web Matrix, select Reports on the left menu.


After that there will be a form of SEO report settings. I let it default.


After setting Report saved, you can directly check validation of your web site. If anyone should be in WebMatrix optimization will give you a warning.


And know you can see it work! :)


SQL Server 2008 R2 Hosting :: Tips How to Restore Database with SQL Server 2008 R2

clock June 28, 2013 07:38 by author Ben

SQL Server 2008 R2 delivers several breakthrough capabilities that will enable your organization to scale database operations with confidence, improve IT and developer efficiency, and enable highly scalable and well managed Business Intelligence on a self-service basis for your users.

This is the tips to restore your database in sql server 2008 :

You need to select the backups which you need to restore from the backup set list.


First, thing to notice here is, it takes a tail-log backup of the source database.
The Backup Sets list does not list all backup sets available in the media, it only lists backups of the selected database:


Also, it is showing only the latest backups since last FULL database backup, just like selecting database as source in earlier versions. Older backup can be restored via "Timeline…", which is self-explanatory:


And to make it complete, it also has a "Verify Backup Media" button. Enjoy it! :)


IIS 7.5 Hosting :: Configuring Pinging to Avoid Terminating Processes

clock June 17, 2013 14:01 by author Ben

IIS monitors the worker processes health by sending a periodic request the worker processes. This pinging is to ensure that if the worker processes responding the incoming requests in timely manner. If the worker process does not respond in a timely manner, IIS terminates the process after a specific number of ping.  Now, consider you are debugging your web application by attaching w3wp.exe from Visual Studio.  During debugging, it might take a long to find out result of debugging and as an out come, execution is on hold as you are pausing around with some breakpoints or playing around the code.

In between your debugging, IIS sending a ping to check worker process health and found it’s not responding, as you are holding the execution around breakpoint or other operation with in visual studio. Resulting of that, IIS terminates the process and you will get error message “The web server process that was being debugged has been terminated by Internet Information Services” .

Now think about it,  you are middle of a debugging session and the worker process process terminates. This will stop your entire debugging. This is quite frustrating and irritating when you are in a middle of debugging and debugger terminates because of the worker process.

Here is the solution:

Open the application pool from IIS Manager and navigate to “Advanced Settings” from the context menu of selected application pool.

This will open “Advanced settings” dialog window. Move to “Process Model” section

By default, you will find,

Ping Enabled = True with Ping Maximum Response Time = 90s and Ping Period = 30s

If worker process responding with in the specified time frame, IIS will keep the worker process alive. But considering the debugging time, the maximum response time is very less.

What you can do over here is, increase the Ping Maximum Response Time  with some values which can ensure worker process will get a response in between health check.

Or, Disable the Pinging by Ping Enabled = False  . By this setting IIS will stop pining your worker process for health checkup.

Note :  This is recommended only for your development environment.  Don’t disable it on Test, staging or Production environments. Worker process health monitoring, terminating processes when there is no timely request are very crucial for application performance.


Tip IIS 8.0 Hosting :: Enabling SSL on IIS 8.0 Using Self-Signed Certificates

clock June 10, 2013 12:27 by author Ben

SSL enables browsers to communicate with a web-server over a secure channel that prevents eavesdropping, tampering and message forgery.  You should always use SSL for login pages where users are entering usernames/passwords, as well as for all other sensitive pages on sites (for example: account pages that show financial or personal information). 

Configuring SSL on Windows with previous versions of IIS has been a pain.  Figuring out how to install and manage a certificate, and then associate it with a web-site, is something I bet most web developers don't know how to enable.

The good news is that IIS 8.0 makes it radically easier to configure and enable SSL.  IIS 8.0 also now has built-in support for creating "Self Signed Certificates" that enable you to easily create test/personal certificates that you can use to quickly SSL enable a site for development or test purposes. 

Using IIS 8.0 you can SSL enable an existing web site in under 30 seconds.  The below tutorial demonstrates how to-do this.

Step 1: Create a New Web Site

We'll start by creating a new web-site using the new IIS 8.0 admin tool.  This admin tool is a complete re-write of the previous IIS admin tool (and was written entirely in managed code using Windows Forms), and provides a more logical organization of web features.  It provides a GUI admin experience for all ASP.NET and IIS settings.
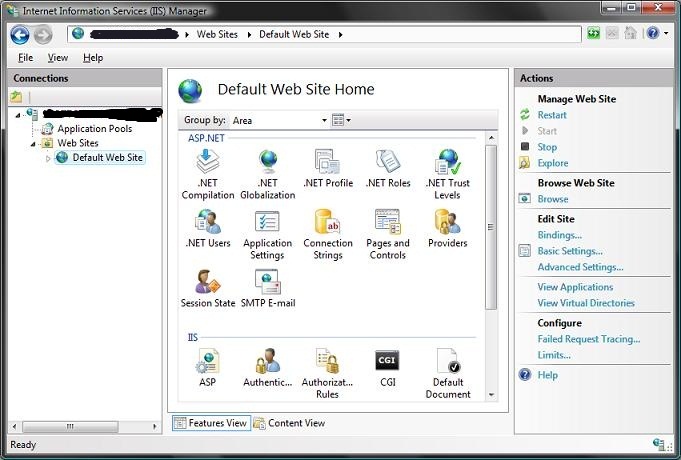
To create a new site on the box, right click on the "Web Sites" node in the left hand tree-view pane and choose the "Add Web Site" context menu option.  Enter the appropriate details to create a new web-site:
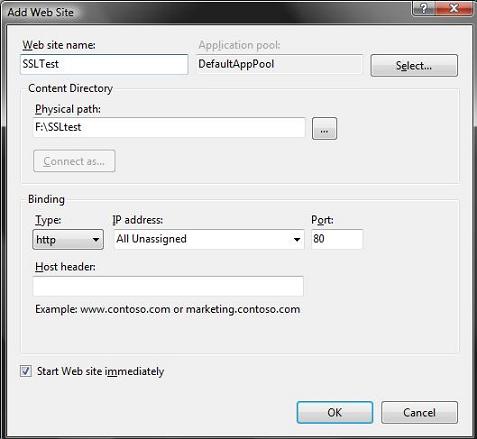
One nice feature of IIS on Windows Vista is that you can now have an unlimited number of sites on a box (previous versions of IIS on Windows Client only allowed 1 site).  The 10 simultaneous request limitation on Windows Client versions of IIS also no longer exists with IIS 8.0.

Once we've completed the above steps, we will now have a brand new site running on our IIS web-server.

Step 2: Create a new Self Signed Certificate
Before binding SSL rules to our new site, we need to first import and setup a security certificate to use with the SSL binding. 

Certificates are managed in IIS 8.0 by clicking the root machine node in the left-hand tree-view explorer, and then selecting the "Server Certificates" icon in the feature pane on the right:
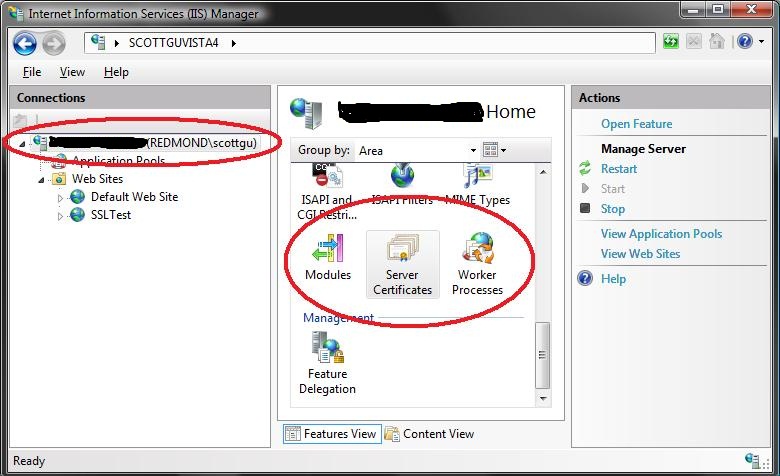
This will then list all certificates registered on the machine, and allow you to optionally import and/or create new ones.

I could optionally go to a certificate authority like Verisign and purchase a certificate to import using this admin UI.  Alternatively, I can create a "self-signed certificate" which is a test certificate that I can use during the development and testing of my site.  To-do this, click the "Create Self-Signed Certificate" link on the right-hand side of the admin tool:
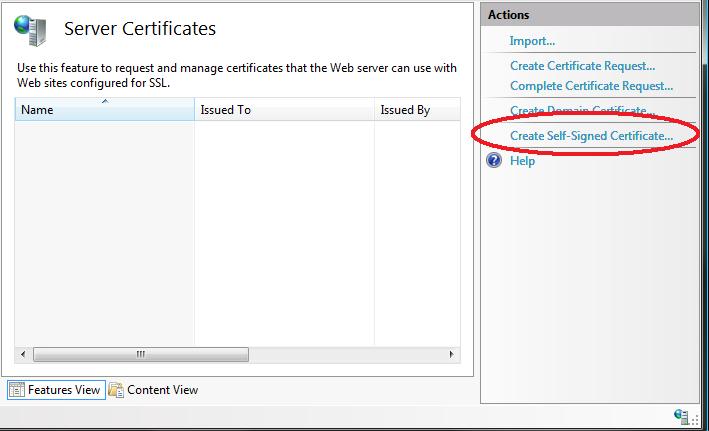
Enter a name to use for the certificate (for example: "test") and hit ok.  IIS8 will then automatically create a new self-signed crypto certificate for you and register it on the machine:
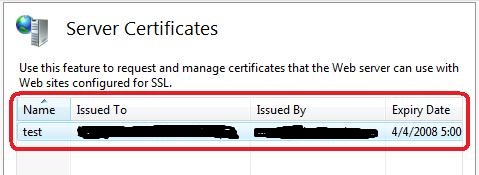
Step 3: Enable HTTPS Bindings for our New Site
To SSL enable the web-site we created earlier, select the web-site node in the left-hand tree-view, and the click the "Bindings" link in its "actions" pane on the right-hand side of the screen:
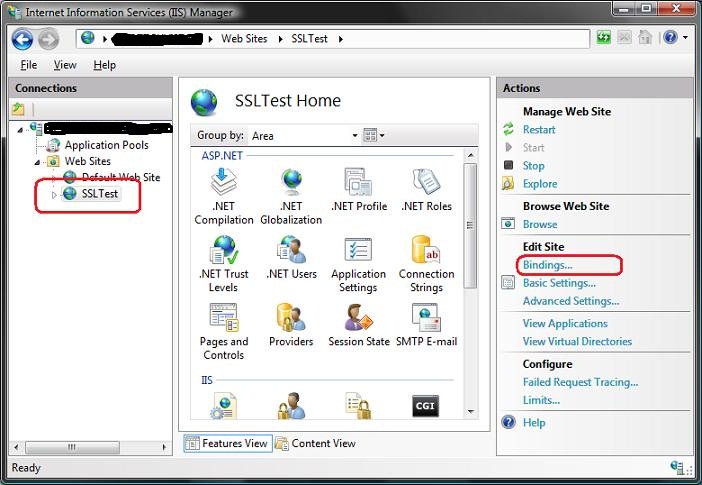
This will then bring up a dialog that lists all of the binding rules that direct traffic to this site (meaning the host-header/IP address/port combinations for the site):
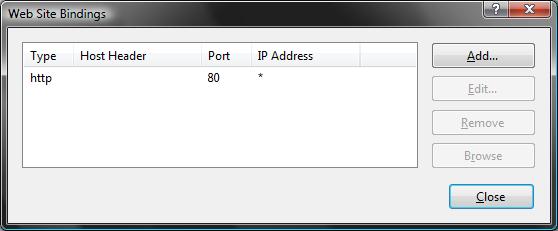
To enable SSL for the site, we'll want to click the "Add" button. This will bring up an "add binding" dialog that we can use to add HTTPS protocol support.  We can select the self-signed certificate we created earlier from the SSL certificate dropdownlist in the dialog, and in doing so indicate that we want to use that certificate when encrypting content over SSL:
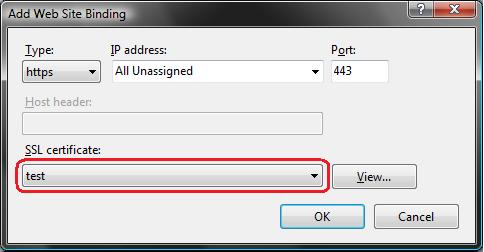
Click ok, and we now have SSL enabled for our site:

Step 4: Test out the Site
Add a "default.aspx" page to the site, and then try and hit it with the browser by typing https://localhost/default.aspx (note the usage of "https" instead of "http" to indicate that you want to connect over SSL).

If you are using IE8, you'll likely see this anti-phishing error message kick in
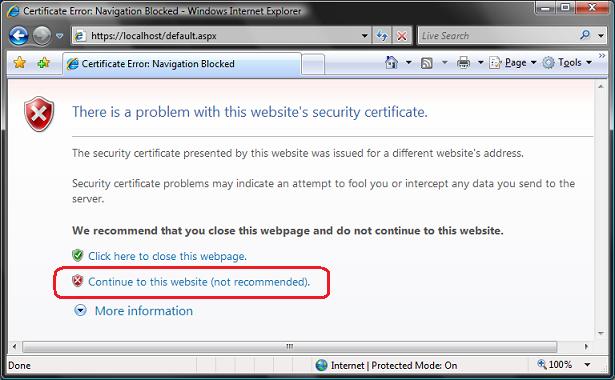
Don't panic if this happens - it is just IE being helpful by suggesting that a self-signed certificate on your local machine looks suspicious. Click the "Continue to this website" link to bypass this security warning and proceed to the site.  You'll find that your default.aspx page is now running protected via SSL:
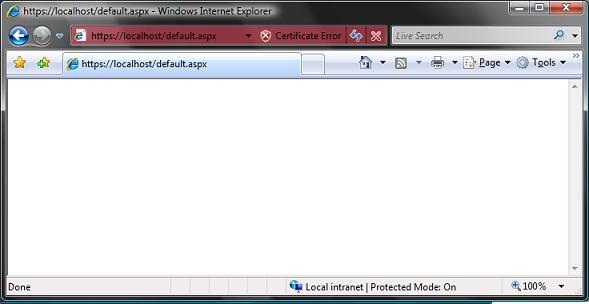
You are all done. :-)

Appendix: A Few Last SSL Notes
A few last SSL related notes:
The IIS 8.0 admin tool has an "SSL Settings" node that you can select for each site, directory or file that allows you to control whether that particular resource (and by default its children) requires an SSL request in order to execute.  This is useful for pages like a login.aspx page, where you want to guarantee that users can only enter their credentials when they are posting via an encrypted channel. If you configure the login.aspx page to require SSL, IIS 8.0 will block browsers from accessing it unless they are doing so over SSL.

Within an ASP.NET page or handler, you can programmatically check whether the current request is using SSL by checking the Request.IsSecure property (it will return "true" if the incoming browser request is over SSL).

You can set the "requireSSL" attribute on the <forms> configuration section within web.config files to have ASP.NET's forms-authentication system ensure that forms-authentication cookies are only set and used on SSL enabled pages and URLs.  This avoids the risk of a hacker trying to intercept the authentication cookie on a non-SSL secured page, and then trying to use a "replay attack" from a different machine to impersonate a user.


Visual Studio Tip :: Configure Code Analysis in Visual Studio

clock June 7, 2013 07:53 by author Ben

I like well-written code, and I especially like it when I've written it. But I don't always live up to my own expectations. So I've used various tools (FxCop, CodeRush, ReSharper) to give me some objective feedback on the quality of my code. Starting with Visual Studio 2010, Microsoft built the latest version of their tools into Visual Studio: Visual Studio 2012 Ultimate (and up) and Visual Studio 2012 Professional (and up). From Visual Studio's Analyze menu, you can select Run Code Analysis on individual projects or on your whole solution.

The code analysis tools will report on whether your code reflects best practices, based on a set of Microsoft's rules. You should realize, however, that just because Microsoft has a specific rule, it doesn't mean that you should write your code according to that rule.

For instance, Microsoft expects all of its projects to use the CLSCompliant attribute. This attribute causes the compiler to check for issues that would prevent your code's external API from being compatible with other .NET Framework code.

For instance, it's perfectly OK in C# to have two public methods with the same name but with different upper and lower case letters (e.g. Update() and uPDATE()). However, those method names would be indistinguishable in Visual Basic, which is why they would violate the CLSCompliant attribute.

However, you probably don't need the CLSComplaint attribute because (a) you're a single language shop, and (b) you probably wouldn't do anything that violates the CLSCompliant attribute anyway (I mean, really: Update and uPDATE?)

It's important, therefore, from the Analyze menu to select the Configure Code Analysis choice and pick the right rule set for you. The Microsoft All Rules choice is almost certainly not the choice you want. Instead, select the <Choose Multiple Rule Sets> option and check off the rule sets that appeal to you. This will let you, over time, remove the rule sets that flag issues you're not interested in.

If you're really committed, consider adding and removing rules from the rulesets themselves. To do that, from the File menu select Open | File and navigate to the folder that the ruleset files are kept in (For my installation of Visual Studio 2012, that's C:\Program Files (x86)\Microsoft Visual Studio 11.0\Team Tools\Static Analysis Tools\Rule Sets\). Opening a ruleset file in Visual Studio will allow you to check off which rules in the ruleset you want to keep and which you want to ignore.


IIS 7.5 Hosting - ASPHostPortal :: IIS 7.5 AppPool Identities

clock May 27, 2013 10:16 by author Ben

Windows 7 and Windows Server 2008 R2 ship with IIS 7.5. It's called Application Pool Identities. Application Pool Identities allows you to run Application Pools under an unique account without having to create and manage domain or local accounts. The name of the Application Pool account corresponds to the name of the Application Pool. The image below shows an IIS worker process (w3wp.exe) running as the DefaultAppPool identity.

Application Pool Identity Accounts
Worker processes in IIS 6 and 7 run as NETWORKSERVICE by default. NETWORKSERVICE is a built-in Windows identity. It doesn't require a password and it has only user privileges, i.e. it is relatively low-privileged. Running as a low-privileged account is a good security practice because then a software bug can't be used by a malicious user to take over the whole system. The problem is however that over time more and more Windows system services started to run as NETWORKSERVICE and services running as NETWORKSERVICE can tamper with other services running under the same identity. Because IIS worker processes run third-party code by default (Classic ASP, ASP.NET, PHP code) it was time to isolate IIS worker processes from other Windows system services and run IIS worker processes under unique identities. The Windows operating system provides a feature called "Virtual Accounts" that allows IIS to create unique identities for each of its Application Pools. Click here for more information about Virtual Accounts.

Configuring IIS Application Pool Identities
If you are running IIS 7.5 on Windows Server 2008 R2 you don't have to do anything. For every Application Pool you create the IIS Admin Process (WAS) will create a virtual account with the name of the new Application Pool and run the Application Pool's worker processes under this account. If you are running Windows Server 2008 you have to change the IdentityType property of the Application Pool you created to "AppPoolIdentity". Here is how:

  • Open the IIS Management Console (INETMGR.MSC).
  • Open the Application Pools node underneath the machine node. Select the Application Pool you want to change to run under an automatically generated Application Pool Identity.
  • Right click the Application Pool and select "Advanced Settings..."

Configure AppPool Identity

  • Select the "Identity" list item and click the button with the three dots.
  • The following dialog appears.

Select the Identity Type "ApplicationPoolIdentity" from the combo box

  • select the Identity Type "ApplicationPoolIdentity" from the combo box

Securing Resources
Whenever a new Application Pool is created the IIS management process creates a security identifier (SID) representing the name of the Application Pool itself, i.e. if you create an Application Pool with the name "MyNewAppPool" a security identifier with the name "MyNewAppPool" is created in the Windows Security system. From this point on resources can be secured using this identity. The identity is not a real user account however, i.e. it will not show up as a user in the Windows User Management Console. You can try this by selecting a file in Windows Explorer and adding the "DefaultAppPool" identity to its Access Control List (ACL).

  1. Open Windows Explorer
  2. Select a file or directory
  3. Right click the file and select "Properties"
  4. Select the "Security" tab
  5. Click the "Edit" and then "Add" button
  6. Click the "Locations" button and make sure you select your machine.
  7. Enter "IIS AppPool\DefaultAppPool" in the "Enter the object names to select:" text box
  8. Click the "Check Names" button and click "OK".

By doing this the file or directory you selected will now also allow the "DefaultAppPool" identity access. You can do this via the command-line using the ICACLS tool. The following example gives full access to the DefaultAppPool identity.

On Windows 7 and Windows Server 2008 R2 the default is to run Application Pools as this security identifier, i.e. as the Application Pool Identity. To make this happen a new identity type with the name "AppPoolIdentity" was introduced. If the "AppPoolIdentity" identity type is selected (default on Windows 7 and Windows Server 2008 R2) IIS will run worker processes as the Application Pool identity. With every other identity type the security identifier will only be injected into the access token of the process. If the identifier is injected content can still be ACLed for the AppPool identity but the owner of the token is probably not unique. Here is an article that explains this concept.

Accessing the Network
Using the NETWORKSERVICE account in a domain environment has a great benefit. Worker process running as NETWORKSERVICE access the network as the machine account. Machine accounts are generated when a machine is joined to a domain. They look like this: <domainname>\<machinename>$, for example: mydomain\machine1$ The nice thing about this is that network resources like file shares or SQL Server databases can be ACLed to allow access for this machine account.

What about AppPool identities?
The good news is that Application Pool identities also use the machine account to access network resources. No changes are required.


IIS 7.5 Hosting - ASPHostPortal :: GZIP compression in IIS 7.5 for JSON response

clock May 15, 2013 12:20 by author Ben

Recently we need to build some RESTful services that responded with JSON and to my surprise these responses are not compressed when I fired up Fiddler and check the Transformer tab.

After enabling Failed Request Tracing in IIS by going to IIS Manager > Web Site > Right Panel > Actions Configure > Failed Request Tracing.

On the same page with the Right Panel of "Actions", under the IIS area, click into Failed Request Tracing Rules.

From there, at the Right Panel, click "Add..." > Specify Content to Trace > All content(*) > Status code(s): type in "200" > Finish.

You should make sure no other request is hitting on the same server at the same time to minimize the logging file creation, which is based on request, if you only have one request when you turn this on, there should only be one fr000001.xml file created in %windir%\inetpub\logs\FailedReqLogFiles\W3SVC1, open that in Internat Explorer and click on Request Details > Search for Compression, expand the corresponding node > Mine says in the node dynamic compression > not success > no_matching_content_type.

So it seems that even though by default HTTP Compression is enabled in IIS 7.5, there are only 3 content types that IIS recognizes and will actually perform the compression.

You can check this in IIS Manager > YOUR_SERVER > Under Management section > Configuration Editor > Expand the system.webServer > httpCompression > dynamicTypes

When you have a RESTful service that serve JSON based response and you would like that to be gzip/compressed whenever client's request includes in the header "Accept-Encoding: gzip", you must update this list to include both mime types

application/json
application/json;
charset=utf-8


in the list, you can either start adding these 2 type in the editor itself or you can run a command line tool AppCmd.exe from %windir%\system32\inetsrv directory, the full command is

appcmd.exe set config -section:system.webServer/httpCompression /+"dynamicTypes.[mimeType='application/json; charset=utf-8',enabled='True']" /commit:apphost

Remember to apply your settings if you are using the GUI editor, I used the command line tool because this is the only one that will add the type along with the "Entry Path", adding through the GUI editor for some reason doesn't add any Entry Type, it still works but I just don't like missing anything.

Now, restart IIS and you can check again in Fiddler and Viola! Now it says GZIP Encoding. You can "Click here to transform" to see the data :)


About ASPHostPortal.com

We’re a company that works differently to most. Value is what we output and help our customers achieve, not how much money we put in the bank. It’s not because we are altruistic. It’s based on an even simpler principle. "Do good things, and good things will come to you".

Success for us is something that is continually experienced, not something that is reached. For us it is all about the experience – more than the journey. Life is a continual experience. We see the Internet as being an incredible amplifier to the experience of life for all of us. It can help humanity come together to explode in knowledge exploration and discussion. It is continual enlightenment of new ideas, experiences, and passions

 photo ahp banner aspnet-01_zps87l92lcl.png

Author Link

Corporate Address (Location)

ASPHostPortal
170 W 56th Street, Suite 121
New York, NY 10019
United States

Sign in