April 14, 2014 08:19 by
 Kenny
Kenny
nopCommerce is one of the most popular ASP.NET shopping cart applications which you can use it for designing your business website for free. nopCommerce is an open source e-commerce solution that contains both a catalog frontend and an administration tool backend. nopCommerce is a fully customizable shopping cart. It's stable and highly usable. From downloads to documentation, nopCommerce.com offers a comprehensive base of information, resources, and support to the nopCommerce community. nopCommerce is a complete open source shopping cart softare, the first edition was released in October 2010, we can say this is still a very new shopping cart application in the market, but their users are growing super-fast in the past 3 years. nopCommerce is a fully customizable shopping cart and you can easily installed it in your hosting account. You just need to download the instalaltion file from official website and use FTP to upload it into your hosting server and unzip the file, then you have to create MSSQL 2005 or 2008 database, and you can install it for your website now.


As the Internet grows as a medium of communication, commerce and interaction, so do the prevalence of risks and security threats. One way to effectively protect your domain is with an SSL certificate. The primary reason why SSL is used is to keep sensitive information sent across the Internet encrypted so that only the intended recipient can understand it. This is important because the information you send on the Internet is passed from computer to computer to get to the destination server. Any computer in between you and the server can see your credit card numbers, usernames and passwords, and other sensitive information if it is not encrypted with an SSL certificate. When an SSL certificate is used, the information becomes unreadable to everyone except for the server you are sending the information to. This protects it from hackers and identity thieves.
In this article, i'm going to explain about how to enable SSL in nopCommerce, you will first need to purchase an SSL certificate and dedicated IP. This article assumes that you already purchase an SSL from SSL provider.
- Install SSL on your web server
- Open web.config file
- Set UseSSL value to true (<add key=”UseSSL” value=”true” /> )
- Then just save the file.
nopCommerce automatically switched to SSL when required ( for example, register, login and checkout admin ect.)
Get SharedSSLUrl from your hosting provider
Open the web.config and edit the following values
<add key=”UseSSL” value=”true” />
<add key=”SharedSSLUrl” value=”https://secure.yourhostingcompany.com/~username” />
<add key=”NonSharedSSLUrl” value=”https://secureyourhostingcompany.com/~username” />
April 4, 2014 13:12 by
KennyWith Visual Studio you can be easier to integrate SQL Reporting Services into ASP.NET web applications. Now, i will explain about how to integrate Report Services into a web application using Visual Studio.
First, you must create a new project in Visual Studio, in the ASP.NET code, you will need to delete (or change) this line:
<!DOCTYPE html PUBLIC "-//W3C//DTD XHTML 1.0 Transitional//EN"
"http://www.w3.org/TR/xhtml1/DTD/xhtml1-transitional.dtd">
Next replace any existing code between the <form> tags with the below code:
<table style="vertical-align: bottom; border-width: 0px; margin-top: 0px;
margin-bottom: 0px; width: 100%; height: 100%; padding: 0px,0px,0px,0px;"
cellspacing="0" cellpadding="0">
<tr>
<td>
HEADER
</td>
</tr>
<tr>
<td>
<div style="border-top: black 1px solid;
background-color: #ece9d8; border-bottom-width: 1px;
border-bottom-color: #d4d0c8; padding-bottom: 10px;">
Custom Controls
</div>
</td>
</tr>
<tr>
<td style="height: 100%;">
<%-- This is where the ReportViewer control will go. --%>
</td>
</tr>
</table>
Switch to the “Design” view since it is now time to add the ReportViewer control.
In the “Data” section within the Toolbox, drag the ReportViewer control onto the last row of your table, which should be taking up most of the page. Next you want to set the control’s properties so that it points to the right server and the right report. Under properties, go to the “Server Report” section. Right above the section you should see a property called “ProcessingMode”. In most cases you are going to want use an instance of a Report Server. So for the purposes of this tutorial, set this property to “Remote”, even if the Report Server instance is on the same computer as your web app. Next, you want to set the “ServerReport” settings.
First, type in address of the Report server in the “ReportSeverUrl” field.
The syntax is:
http:// NameOfServer / reportserver
i.e. http://ServerOne/reportserver
Next type in the location of the report in the “ReportPath” field.
i.e. /MyReports/TheReport
The location is easy to know since it is the same path structure that you see in the Report Manager. Also, always be sure the put a forward slash first before the actual path.
Unless you want the ReportViewer to be an absolute size, go ahead and set the height and width settings under the “Layout” section to be 100%. The ReportViewer will by default show controls to set the parameters for the report. These often look a little ugly, and I would recommend most developers to create their own parameter controls. This can be done in the control bar row of the template provided above. To get rid of the ReportViewer’s parameter controls set the “ShowParameterPrompts” in the properties underneath “Appearance” to false. In, the next section I’ll show how you can set the report parameters with your own code.
Those should be all the settings you need to make for the ReportViewer to display correctly, unless your version of Visual Studio has other default settings. Double check to make sure the ASP.NET looks similar to this code:
<rsweb:ReportViewer ID="ReportViewer1" runat="server" Height="100%"
ProcessingMode="Remote" ShowParameterPrompts="False" Width="100%">
<ServerReport ReportPath="/MyReports/TheReport" />
</rsweb:ReportViewer>
Now, the report is ready to be processed. You can go ahead and preview your website and the report should generate just fine.
March 19, 2014 07:39 by
KennyASP.NET MVC 5 uses Bootstrap 3 as the CSS Framework in its default ASP.NET Web Application Tempate. This is a nice touch as most ASP.NET MVC developers have at least played with Bootstrap and are designing responsive websites. I'll mention the use of Bootstrap here briefly as there really isn't much to it.

When you create a new ASP.NET MVC 5 Web Application in Visual Studio 2013 it is using Bootstrap 3 as its default CSS Framework. You get the pleasure of the responsive navigation and website along with all the typography and other bells and whistles you expect from Bootstrap 3.

Inside the ASP.NET MVC 5 Website Template you will find the bootstrap.css and bootstrap.min.css stylesheets as well as the bootstrap.js and bootstrap.min.js scripts. The _Layout.cshtml view and other views are marked up appropriately using the CSS selectors in Bootstrap 3.
By default, the ASP.NET MVC Website Template uses a couple of bundles that use both Bootstrap 3 CSS as well as Modernizr. Check out the Layout.cshtml view to see the use of two of the bundles.
@Styles.Render("~/Content/css")
@Scripts.Render("~/bundles/modernizr")
You will find these bundles configured in the BundleConfig.cs file in App_Start.
bundles.Add(new ScriptBundle("~/bundles/modernizr").Include(
"~/Scripts/modernizr-*"));
bundles.Add(new StyleBundle("~/Content/css").Include(
"~/Content/bootstrap.css",
"~/Content/site.css"));
And, of course, the CSS selectors and markup in the new ASP.NET MVC 5 Views are based on Bootstrap 3.
This isn't a huge deal, but it's still nice to see ASP.NET MVC 5 using Bootstrap 3 by default. Certainly, you can remove it for Foundation, Skeleton, or other CSS and JavaScript Framework of your choice.
February 19, 2014 11:42 by
Kenny
Learning SQL can be very rewarding. Once you have a basic understanding of SQL, you can start to develop more advanced websites, and you can (hopefully) charge more money for doing so!
Now, we will give you tutorial about how to get data from Database and that Database can be fetched as Label text or textbox text:
Basically, there are six step for this tutorial:
1. Design View
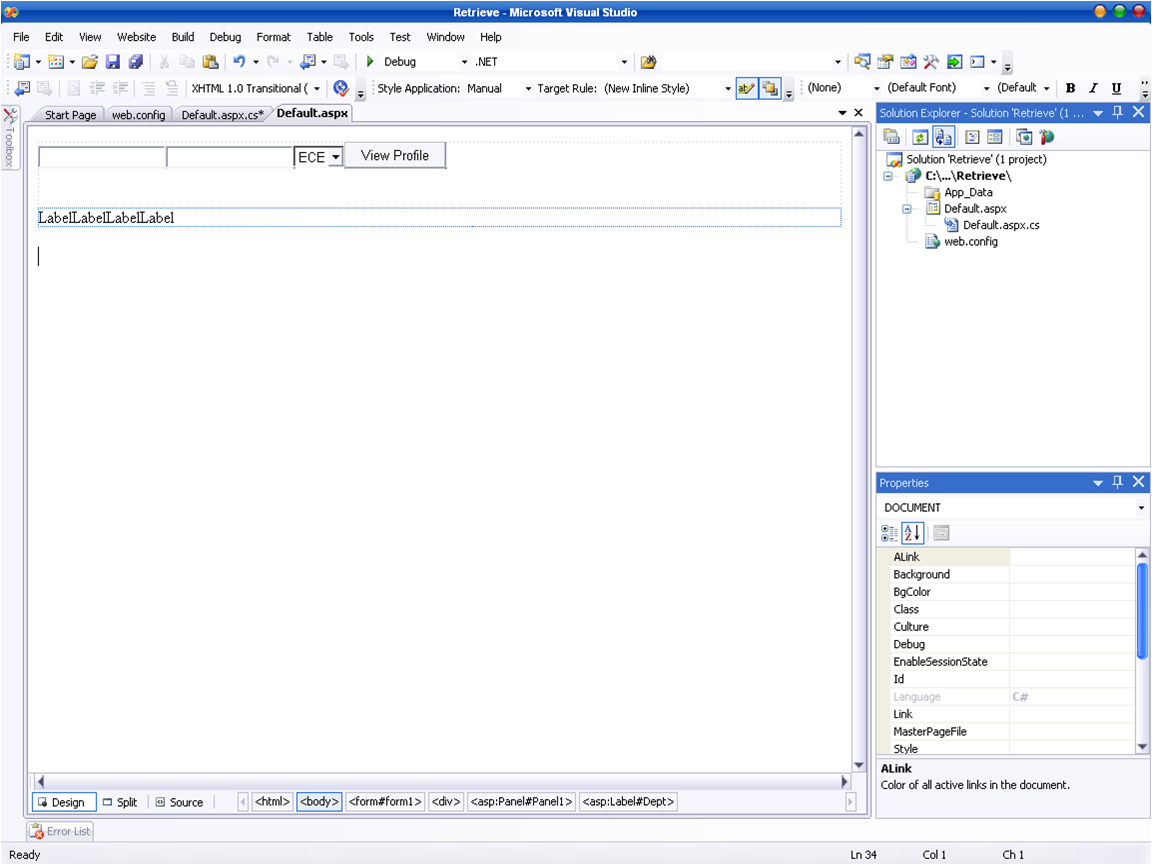

2. Source View

3. Code Behind
Here I've using Student database
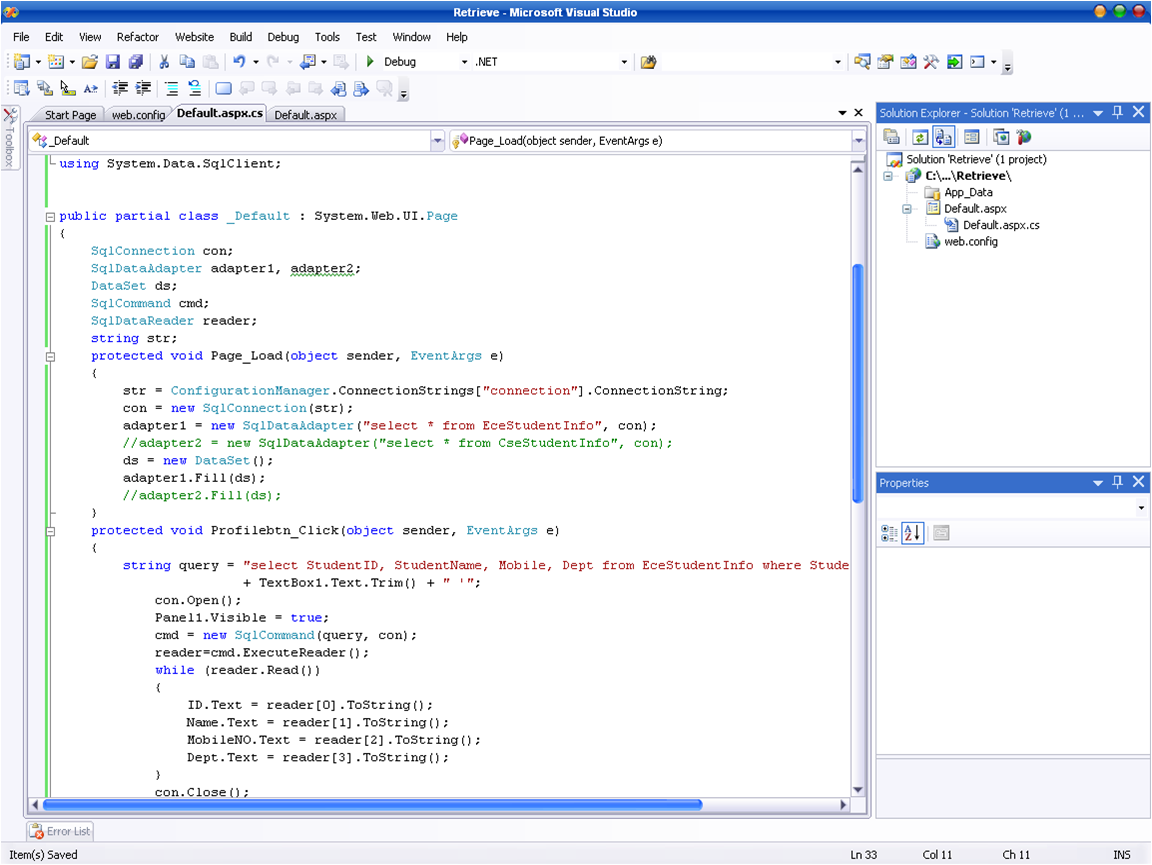
4. Output After Debugging Before Giving Input Data:
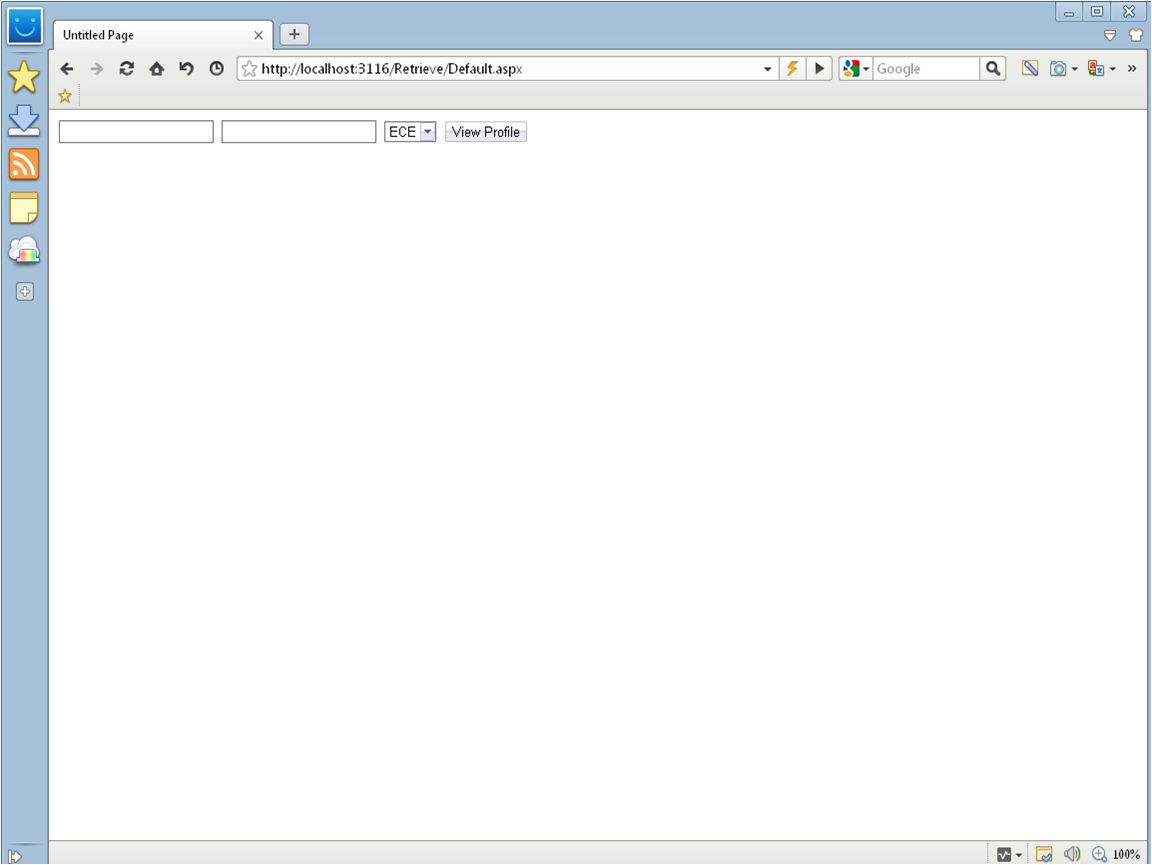
5. Student Database
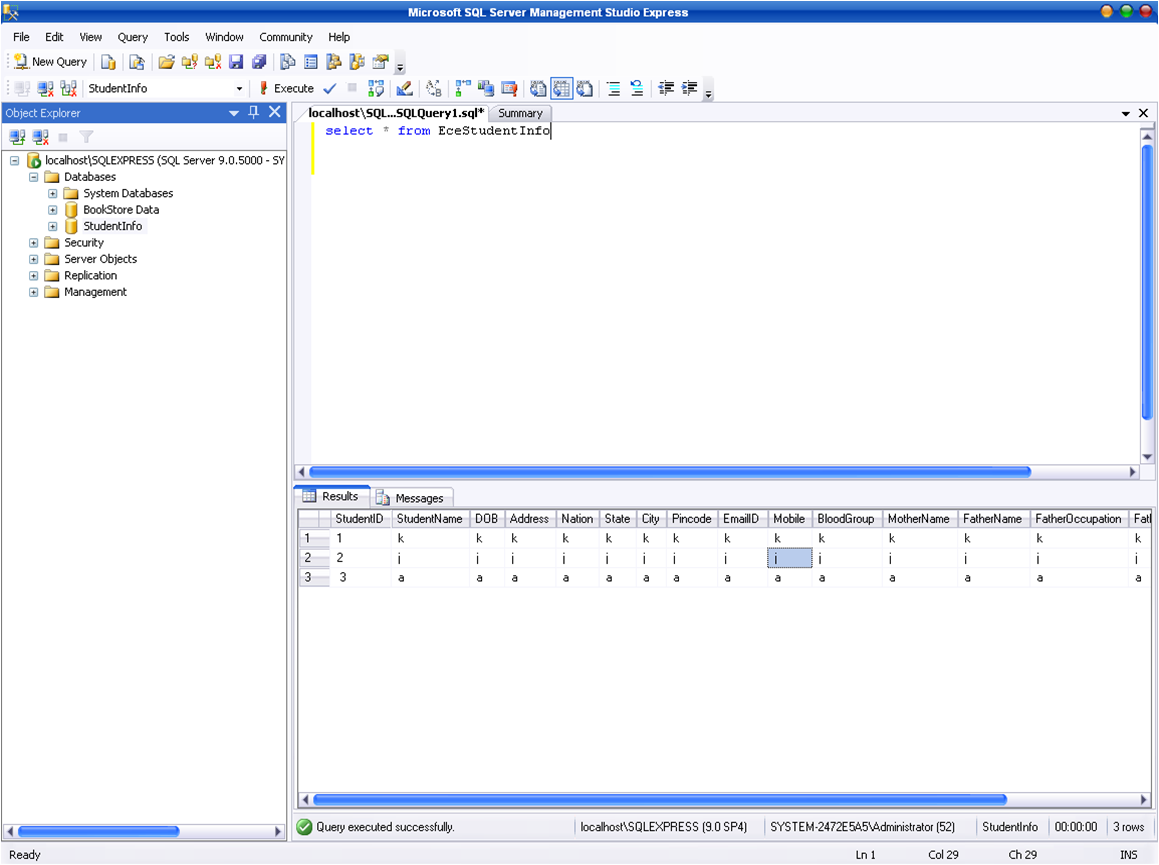
6. Output