Windows 2012 Hosting - MVC 6 and SQL 2014 BLOG

Tutorial and Articles about Windows Hosting, SQL Hosting, MVC Hosting, and Silverlight Hosting

Cheap SQL SSRS 2014 Hosting :: How to Configure Available Memory for SQL Server Reporting Services 2014

clock July 18, 2014 07:35 by author Ben

Reporting Services is a server-based reporting platform that provides comprehensive reporting functionality for a variety of data sources. Reporting Services includes a complete set of tools for you to create, manage, and deliver reports, and APIs that enables developers to integrate or extend data and report processing in custom applications. Reporting Services tools work within the Microsoft Visual Studio environment and are fully integrated with SQL Server tools and components.

Today we're going to cover how to configure available memory for SQL Server Reporting Services 2014. If you need to configure the amount of memory available to an instance of SSRS 2014 you have to get your hands dirty and edit the RsReportServer.config file. The RsReportServer.config file stores settings that are used by Report Manager, the Report Server Web service, and background processing.

The location of the rsconfile file is generally:

\Program Files\Microsoft SQL Server\MSRS1111.MSSQLSERVER\Reporting Services\ReportServer

Within the RsReportServer.config file, configuration settings that control memory allocation for the report server include WorkingSetMaximum, WorkingSetMinimum, MemorySafetyMargin, and MemoryThreshold. If you were to open the file you will see that the WorkingSetMinimum and WorkingSetMaximum are not present by default.

<Service>
 <IsSchedulingService>True</IsSchedulingService>
   <IsNotificationService>True</IsNotificationService>
     <IsEventService>True</IsEventService>
       <PollingInterval>10</PollingInterval>
         <WindowsServiceUseFileShareStorage>False</WindowsServiceUseFileShareStorage>
           <MemorySafetyMargin>80</MemorySafetyMargin>
         <MemoryThreshold>90</MemoryThreshold>
       <RecycleTime>720</RecycleTime>
    <MaxAppDomainUnloadTime>30</MaxAppDomainUnloadTime>
 <MaxQueueThreads>0</MaxQueueThreads>


This is because you have to enter them yourself, as if you are hosting multiple applications on the same computer and you determine that the report server is using a disproportionate amount of system resources relative to other applications on the same computer.

<Service>
  <IsSchedulingService>True</IsSchedulingService>
    <IsNotificationService>True</IsNotificationService>
      <IsEventService>True</IsEventService>
        <PollingInterval>10</PollingInterval>
          <WindowsServiceUseFileShareStorage>False</WindowsServiceUseFileShareStorage>
        <MemorySafetyMargin>80</MemorySafetyMargin>
      <MemoryThreshold>90</MemoryThreshold>
    <RecycleTime>720</RecycleTime>
 <WorkingSetMaximum>786432</WorkingSetMaximum>
<WorkingSetMinimum>524288</WorkingSetMinimum>
 <MaxAppDomainUnloadTime>30</MaxAppDomainUnloadTime>
   <MaxQueueThreads>0</MaxQueueThreads>


The Reasons To Use SQL Reporting Service (SSRS) 2014 Hosting with ASPHostPortal.com

  • Fully Integrated with SharePoint
  • The report development environment is a Standard Microsoft Platform - SSRS Reports are developed in BIDS (Business Intelligence Development Studio).
  • Customizable Report Rendering - SSRS provides a .NET Web Service programmatically accessible to extend the delivery of reports beyond the browser. The SSRS reports can be rendered to HTML. PDF(Portable Document Format), Microsoft Excel, XML, MHTML (MIME HTML), TIFF (Tagged Image File Format). Microsoft Word, and ATOM. The SSRS .NET Web Service allows embedding reports in custom applications where the look and feel of the report viewer can be easily controlled and customized.
  • Mobile Support - Starting SQL Server 2012 Service Pack 1 (SP1), SSRS supports viewing and basic interactivity with reports on Microsoft Surface devices and devices with Apple iOS6 and Apple Safari Browser such as iPAD. SSRS reports can also be view on Windows 8 devices.


SQL Server Hosting with ASPHostPortal.com :: How to Backup and Restore Your Database with PowerShell Commands

clock July 10, 2014 09:20 by author Ben

PowerShell is Microsoft’s new command-line shell and scripting language that promises to simplify automation and integration across different Microsoft applications and components. Database professionals can leverage PowerShell by utilizing its numerous built-in cmdlets, or using any of the readily available .NET classes, to automate database tasks, simplify integration, or just discover new ways to accomplish the job at hand.

Windows PowerShell commands can be a valuable addition to your SQL Server management tools. PowerShell is going to replace SQL Server Management Studio (SSMS) anytime soon, it can be used for a wide range of scripted management tasks. PowerShell can run T-SQL commands and also work with objects outside of the SQL Server database. You can use the SQL Server PowerShell Provider to navigate and manage SQL Server database objects, and PowerShell scripts can be run by SQL Agent.

Here is a working Windows PowerShell script to perform a FULL database backup against the Northwind database, storing the backup file in your file system.

[System.Reflection.Assembly]::LoadWithPartialName('Microsoft.SqlServer.SMO') | out-null
$s = New-Object ('Microsoft.SqlServer.Management.Smo.Server') "LOCALHOST\SQL2005_1"

#Create a Backup object instance with the Microsoft.SqlServer.Management.Smo.Backup namespace
$dbBackup = new-object ("Microsoft.SqlServer.Management.Smo.Backup")

#Set the Database property to Northwind
$dbBackup.Database = "Northwind"

#Add the backup file to the Devices collection and specify File as the backup type
$dbBackup.Devices.AddDevice("D:\PSScripts\backups\NWind_FULL.bak", "File")

#Specify the Action property to generate a FULL backup
$dbBackup.Action="Database"

#Call the SqlBackup method to generate the backup
$dbBackup.SqlBackup($s)


Since you won't be performing backups of just a single database, it would be better if we loop the entire script in a For-Each cmdlet iterating thru the Databases collection of the Server object.

[System.Reflection.Assembly]::LoadWithPartialName("Microsoft.SqlServer.SMO") | out-null
$s = new-object ("Microsoft.SqlServer.Management.Smo.Server") $instance

$bkdir = "D:\PSScripts\backups" #We define the folder path as a variable
$dbs = $s.Databases
foreach ($db in $dbs)
{
     if($db.Name -ne "tempdb") #We don't want to backup the tempdb database
     {
     $dbname = $db.Name
     $dt = get-date -format yyyyMMddHHmm #We use this to create a file name based on the timestamp
     $dbBackup = new-object ("Microsoft.SqlServer.Management.Smo.Backup")
     $dbBackup.Action = "Database"
     $dbBackup.Database = $dbname
     $dbBackup.Devices.AddDevice($bkdir + "\" + $dbname + "_db_" + $dt + ".bak", "File")
     $dbBackup.SqlBackup($s)
     }
}


There are a lot of different reasons why we need to restore databases, so there are a lot more options with restores than there are with backups. The easiest way to demonstrate a restore is to simply restore a database from a full backup, setting the option to overwrite the existing database.

Restore-SqlDatabase -ServerInstance TESTSQL -Database Northwind`
-BackupFile "E:\Backup\Northwind_db_20130420153024.bak" -ReplaceDatabase


Cheap SQL Hosting with ASPHostPortal.com
Providing the best security, compliance, performance, and managed service separates ASPHostPortal.com from other hosting companies. MS SQL server supports our commitment to providing service options the businesses that choose ASPHostPortal.com demand. Use the Promo Code "DBSQL" (without quotes) and receive double SQL Server Space!


Cheap SQL 2014 Hosting with ASPHostPortal.com:: How to Create Cron Job to Backup Your SQL Database

clock June 20, 2014 08:31 by author Ben

Cron Jobs are used for scheduling tasks to run on the server. They're most commonly used for automating system maintenance or administration. However, they are also relevant to web application development. There are many situations when a web application may need certain tasks to run periodically. A cron job/scheduled task is a system-side automatic task that can be configured to run for an infinite number of times at a given interval. Cron/scheduled task allows you to schedule a command or a script to run at a specific time of day, or on a specific day of the week or at a particular time of day on a specific day of the month. It allow for scheduling down to the minute and up to an annual event.

Here is the simple step how to create Cron Job to Backup Your SQL Database :

Step 1. Create a folder to store the backup in your FTP application
Open your ftp application and connect to the account that has the database you want to back up. Create a folder outside of the webcontent called "backups".
fs1-n02stor1wc1dfw2382489382489www.yoursite.combackups

Step 2. Set folder permissions in your FTP application
Right click the folder and add all write permissions. If your Ftp software doesn't do this then checkout the free FTP client called FileZilla.

Step 3. Create a stored procedure that performs the backup with an input parameter for the filename
Connect to your database using a client  and run a query like this. The procedure will be named FullBackup in this example

set ANSI_NULLS ON
set QUOTED_IDENTIFIER ON
GO

CREATE PROCEDURE [dbo].[FullBackup]
 @FileName  nvarchar(256)
AS
BEGIN

SET NOCOUNT ON;

BACKUP DATABASE [123456_YourDatabase] TO  DISK = @FileName WITH NOFORMAT, NOINIT,  NAME = N'Full Database Backup', SKIP, NOREWIND, NOUNLOAD,  STATS = 10

END


Step 4. Create a web page that executes the stored procedure
You can use php or asp.net for this also. For something this simple, you can use classic asp. That way there is no .dll to deal with and no application restart needed.  Now create a new asp page and called it backupdb.asp.  The contents of the file are as follows. When you are done, upload this file to a folder in your content area.
This script will generate a filename based on the date. If a backup already exists for that date it will increment a version counter until a fresh filename is found. This script will generate 1 file per execution. Modify as needed if you want to increment a single file.  Edit the location & connection string to work for you.

<%@LANGUAGE="VBSCRIPT" CODEPAGE="65001"%>
<!DOCTYPE html PUBLIC "-//W3C//DTD XHTML 1.0 Transitional//EN" "http://www.w3.org/TR/xhtml1/DTD/xhtml1-transitional.dtd">
<html xmlns="http://www.w3.org/1999/xhtml">
<head>
<meta http-equiv="Content-Type" content="text/html; charset=utf-8" />
<title>Untitled Document</title>
</head>

<body>

<%
    dim thismonth, thisday, thisyear, location, filelename, ver, extention, abolutespath

thismonth= datepart("m", now())
thisday=datepart("d", now())
thisyear=datepart("yyyy",now())

location="fs1-n03stor1wc1dfw8382492382489www.yoursite.combackups"
filename="dbBackup-" & thismonth & "-" & thisday & "-" & thisyear & "_"
ver=1
extention=".bak"

absolutepath=location & filename & ver & extention

    set fso = Server.CreateObject("Scripting.FileSystemObject")
 
while (fso.FileExists(absolutepath)=True)
ver=ver+1
absolutepath=location & filename & ver & extention
wend

    Set cn = Server.CreateObject("ADODB.Connection")
    cn.connectionString= "Provider=SQLNCLI;Server=mssql05-01.wc1;Database=123456_YourDatabase;Uid=123456_YourUsername; Pwd=Yourpassword;"
   cn.open

   Set cmd = Server.CreateObject("ADODB.Command")
   Set cmd.ActiveConnection = cn
   cmd.CommandText = "FullBackup"
   cmd.CommandType = 4 'adCmdStoredProc
 
   cmd.Parameters.Refresh
   cmd.Parameters(1) = absolutepath
 
   cmd.Execute

   cn.close
 
%>

   Execution complete:  Filename=<%= filename & ver & extention%>

</body>
</html>


Step 5.  Schedule a Cron job to call the web page.

Access your control panel and go to the features tab of the site with the database. Choose http as the language, Enter the URL to the asp script and your email and Schedule the job for a daily run at an off hour.

Our Special SQL Server 2014 Hosting Complete Features

What we think makes ASPHostPortal.com so compelling is how deeply integrated all the pieces are. We integrate and centralize everything--from the systems to the control panel software to the process of buying a domain name. For us, that means we can innovate literally everywhere. We've put the guys who develop the software and the admins who watch over the server right next to the 24-hour Fanatical Support team, so we all learn from each other.

Full Remote Access - We allow you full remote connectivity to your SQL Server 2014 Hosting database and do not restrict access in any way.
Easily transfer your existing SQL Server database - With our SQL Server hosting package, there's no need to rebuild your database from scratch should you wish to transfer an existing SQL Server database to us. If you already have a database hosted elsewhere, you can easily transfer the contents of your database using SQL Server Management Studio which is fully supported by our packages. SSMS provides you with an Import/Export wizard which you can use to upload your data and stored procedures with a couple of clicks.


SQL Server 2014 Hosting with ASPHostPortal.com :: New Feature in SQL Server 2014 - Business Intelligence

clock June 16, 2014 07:24 by author Kenny

Business Intelligence - New Feature of SQL Server 2014

SQL Server 2014 includes business intelligence (BI) improvements to help build and support vast databases and data warehouses.

Microsoft has been pouring R&D resourcesinto building out its business intelligence (BI) feature set and the upcoming SQL Server 2014 (SQL2014) release will continue that trend. The new release includes enhancements to make data exploration easier, improvements in BI semantic modeling, new offerings to help build and support massive databases and data warehouses, and tools to ensure the quality and consistency of data. Here’s what SQL2014 will do for you with regards to business intelligence:

BI Semantic Model in SQL Server 2014

Microsoft’s improvements in their BI Semantic Modeling (BISM) enables users new ways to build out BI solutions the scale from small, single-person usage to huge Fortune 500 organizations, focusing on credible and consistent data.

Data Exploration Enhancements in SQL Server 2014

Microsoft has more than 300 million users who think of Excel when they think about manipulating data. It only makes sense to reinforce the relationship between Excel and to a wider extent Microsoft Office, as a front end for data manipulation, exploration, and visualization against a SQL Server back end all through the rich and familiar front end of Excel. Microsoft’s new PowerPivot add-in for Excel makes accessing and analyzing data very easy for end users. The new Power View browser-based add-in for Excel adds new, powerful means of visualizing data, wherever it resides. Other new tools include Power Map (formerly known as Project GeoFlow) and Project Data Explorer, for better mapping and geographic data integration and data import into Excel for heterogeneous data sources, respectively.

Enterprise Information Management (EIM)

Enterprises need help controlling the spread of data silos and ensuring the quality and consistency of data. Microsoft has introduced or enhanced several tools to serve this requirement. The Data Quality Services (DQS) tools help enterprises and data stewards manage end-to-end data management by building a knowledge base of data-quality topics. Master Data Services (MDS) adds new features, such as an MDS add-in for Excel, to map objects, reference data, and control dimensions and hierarchies of data.

Big Data

Big data gets even easier in SQL2014. There are lots of new offerings to help build and support massive databases and data warehouses, such as scaling up to 15k partitions in a data store and up to 640 logical cores on high-end database servers. In addition, Microsoft has fully embraced Hadoop in the form of HDInsight, on Windows Azure and Windows Server, to take advantage of unstructured data and the parallel computational approach common to Hadoop applications. PolyBase, also new in SQL2014, is a feature of the SQL Server Parallel Data Warehouse (PDW) which makes combining nonrelational data and traditional relation data an easy and swift process.

Microsoft has just announced new integrated BI functionality for Office 365 Power BI for Office 365. Previous add-on options Data Explorer and Geoflow have been integrated into the BI Suite and have been renamed as Power Query (Data Explorer) and Power Map (Geoflow). Power Query enables users to pull in information from the web or external sources and merge it with local data, providing for an easier method for enriching your internal data. Power Map provides enhanced mapping capabilities and the ability to interact with any geographic data you may have.


Cheap Windows Hosting Based in USA:: How to Fix SQL Injection Vulnerabilities in ASP.NET

clock June 5, 2014 07:07 by author Ben

Simply stated, SQL injection vulnerabilities are caused by software applications that accept data from an untrusted source (internet users), fail to properly validate and sanitize the data, and subsequently use that data to dynamically construct an SQL query to the database backing that application. For example, imagine a simple application that takes inputs of a username and password. It may ultimately process this input in an SQL statement of the form

string query = "SELECT * FROM users WHERE username = "'" + username + "' AND password = '" + password + "'";

Since this query is constructed by concatenating an input string directly from the user, the query behaves correctly only if password does not contain a single-quote character.

Impact of SQL Injection vulnerabilities

  • Reading, Updating and Deleting arbitrary data from the database
  • Executing commands on the underlying operating system
  • Reading, Updating and Deleting arbitrary tables from the database

There are many way finding SQL Injection Vulnerabilities manually. But, in this article, I will show you how to find SQL Injection Vulnerabilities automatically. It’s no different than finding it manually. The process mainly involves three tasks :

  • Identifying Data Entry.
  • Inject Data to Database.
  • And last, detect anomalies from it’s response

you will see that you can do it automatically to a certain process. Identifying data entry (1st step) is something that can be automated. You can do it by just crawl the website and finding GET and POST request. As well ass Data Injection (2nd step), can also be done in an automatic fashion. The main problem is the 3rd step ( Detect Anomalies Response of Remote Server ). Although this part is easy for human to detect. it sometimes very difficult for a bot or software to detect it and fully understand output of the remote server. For example, when the web application returns the SQL error from database or when the web application returns HTTP 500 code error.

How to Fix SQL Injection Vulnerabilities in ASP.NET

c# code:

string queryText = "SELECT * FROM Students WHERE City=@City";
SqlCommand cmd = new SqlCommand(queryText, conn);
cmd.Parameters.Add("@City",City);
SqlDataAdapter da = new SqlDataAdapter(cmd);
DataSet ds = new DataSet();
da.Fill(ds);
return ds;


ASP.NET code:

/*C# code*/
string commandText = "SELECT * FROM Customers WHERE Country=@CountryName";
SqlCommand cmd = new SqlCommand(commandText, conn);
cmd.Parameters.Add("@CountryName",countryName);


Stored Procedure:

var connect = ConfigurationManager.ConnectionStrings["NorthWind"].ToString();
var query = "GetProductByID";
using (var conn = new SqlConnection(connect))
{
  using (var cmd = new SqlCommand(query, conn))
  {
    cmd.CommandType = CommandType.StoredProcedure;
    cmd.Parameters.Add("@ProductID", SqlDbType.Int).Value = Convert.ToInt32(Request["ProductID"]);
    conn.Open();
    //Process results
  }
}


Fixing the SQL Injection Vulnerabilities would not be enough to protect your web application. You need to protect it using Runtime Protection.

Cheap SQL Hosting with ASPHostPortal.com
Providing the best security, compliance, performance, and managed service separates ASPHostPortal.com from other hosting companies. MS SQL server supports our commitment to providing service options the businesses that choose ASPHostPortal.com demand. Use the Promo Code "DBSQL" (without quotes) and receive double SQL Server Space!


mojoPortal Hosting - How to Recover Password Login on Your mojoPortal Site

clock April 29, 2014 07:54 by author Ben

mojoPortal is another open source CMS option based upon the .NET framework. It has a very active developer group and is consistently being updated. While it is free to download and use, there are a number of commercial add-ons that are used to help fund the project. When it comes to developing your own applications, many people prefer mojoPortal because it can act as a starter kit for advanced .NET sites or portals.

mojoPortal is also considered to be very strong as a standalone CMS. It is easy to learn and very simple to use. It includes a variety of different tools such as blogs, photo galleries, chat, newsletters, pools, forums, and much more. It also has a very strong community which makes troubleshooting extremely simple.

Here is the tutorial how to recover password login on your mojoPortal site :

However, in order to use this feature you require login e-mail which you used either at the time of installation or while updating the site later on.

Sometimes, you will forget password but your login e-mail id will be the default provided by the installer – [email protected]

In such a scenario, you need to dig deep into the database to find out the password as mentioned below

  1. Open SQL Server 2008 / 2012
  2. You will view a dialog named – Connect to Server
  3. Provide the database name, database username and password which you provided at the time of mojoportal installation process.
  4. If you installed MojoPortal through Web App Gallery from within WebsitePanel then you need to search for “user.config” file from the file manager and fetch the required credentials.
  5. If the provided credentials are correct then you will be logged into SQL Server. Locate your database from the navigation panel located on the left hand side.
  6. Expand the database name, then Tables and locate the table name – dbo.mp_Users
  7. Right click on the above mentioned table and select the option – Select Top 1000 Rows
  8. SQL Server will display the list of entries under each column. By default, it will only show details of Admin user. However, you will view more entries if your site is bit old and users have registered on the site.
  9. In order to view the password of admin user, you need to scroll horizontally until you see the column name – Pwd.


It is to be noted that MojoPortal displays passwords as such without any kind of encryption. Hence, you should use very strong password for the database, FTP and administrator user account.


ASPHostPortal.com Proudly Announces SQL Server 2014 Hosting

clock April 8, 2014 08:19 by author Ben

ASPHostPortal.com, a reliable web hosting company specializing in ASP.NET hosting services, announces the deployment of SQL Server 2014 in its web hosting packages.

ASPHostPortal.com now provides the SQL Server 2014 in all of web hosting packages, assisting all their web hosting customers on organizing, improving and securing business’ data. Making business decisions are the crucial steps that businesses need to take, mostly in short time. It requires accessing company’s data in easy manner to be analyzed and evaluated. The SQL Server 2014 has the excellent tool to do this. With the Power View, businesses will be able to excerpt data into PowerPoint presentations and bring updated information in every meeting.


Businesses are often must face complicated issues, whether it occurs inside the organization or related to clients and customers. For example, clients often want their data quality being improved regularly that can be a challenging task. With the SQL Server 2014 this process can be reduced this problem since it has the ability to enhance the consistency and accuracy of the data. The SQL Server 2014 works by cleaning out the data thus resulting in superior quality and enduring maintenance.

The basic shared hosting service is supported by SQL Server 2014 web hosting and the site provides this plan at a monthly cost of $5. The site assures a 24x7 customer support service and guarantees a 99.9% uptime as they have installed fully servers. The company through its website gives all its customers a Plesk Panel which is basically server management software.

“Our customers have been asking us about SQL Server 2014 and we are happy to deliver a hosting platform that supports all the latest in the Microsoft Web Stack.” said said Dean Thomas, Manager at ASPHostPortal.com.  "And it proves that we remain at the forefront in Microsoft technology".

ASPHostPortal.com is a popular SQL Server 2014 hosting service provider with all of its  hosting plans to help users to automate and simplify website and server administration tasks such as  installation and migration. For more information about this topics or have any enquiries related to SQL Server 2014 hosting,  please visit http://asphostportal.com/SQL-2014-Hosting.

ASPHostPortal.com is now providing this FREE DOMAIN and DOUBLE SQL Space promotion link for new clients to enjoy the company's outstanding web hosting service at a low cost from just $5.00/mo. This offer valids only from 21st March 2014 to 20 April 2014 and it applies to all the new clients registered during these dates only.

About ASPHostPortal.com:

ASPHostPortal.com is a hosting company that best support in Windows and ASP.NET-based hosting. Services include shared hosting, reseller hosting, and sharepoint hosting, with specialty in ASP.NET, SQL Server, and architecting highly scalable solutions. As a leading small to mid-sized business web hosting provider, ASPHostPortal.com strive to offer the most technologically advanced hosting solutions available to all customers across the world. Security, reliability, and performance are at the core of hosting operations to ensure each site and/or application hosted is highly secured and performs at optimum level.


Reporting Services Hosting with ASPHostPortal :: Integrating Reporting Services Into a Web Application

clock April 4, 2014 13:12 by author Kenny

With Visual Studio you can be easier to integrate SQL Reporting Services into ASP.NET web applications. Now, i will explain about how to integrate Report Services into a web application using Visual Studio.

First, you must create a new project in Visual Studio, in the ASP.NET code, you will need to delete (or change) this line:
<!DOCTYPE html PUBLIC "-//W3C//DTD XHTML 1.0 Transitional//EN"
    "http://www.w3.org/TR/xhtml1/DTD/xhtml1-transitional.dtd">

Next replace any existing code between the <form> tags with the below code:
<table style="vertical-align: bottom; border-width: 0px; margin-top: 0px;
   margin-bottom: 0px; width: 100%; height: 100%; padding: 0px,0px,0px,0px;"
   cellspacing="0" cellpadding="0">
    <tr>
        <td>
            HEADER
        </td>
    </tr>
    <tr>
        <td>
            <div style="border-top: black 1px solid;
                background-color: #ece9d8; border-bottom-width: 1px;
                border-bottom-color: #d4d0c8; padding-bottom: 10px;">
                Custom Controls
            </div>
       </td>
    </tr>
    <tr>
        <td style="height: 100%;">
            <%-- This is where the ReportViewer control will go. --%>
        </td>
    </tr>
</table>


Switch to the “Design” view since it is now time to add the ReportViewer control.
In the “Data” section within the Toolbox, drag the ReportViewer control onto the last row of your table, which should be taking up most of the page. Next you want to set the control’s properties so that it points to the right server and the right report. Under properties, go to the “Server Report” section. Right above the section you should see a property called “ProcessingMode”. In most cases you are going to want use an instance of a Report Server. So for the purposes of this tutorial, set this property to “Remote”, even if the Report Server instance is on the same computer as your web app. Next, you want to set the “ServerReport” settings.

First, type in address of the Report server in the “ReportSeverUrl” field.
The syntax is:
http:// NameOfServer / reportserver
i.e. http://ServerOne/reportserver

Next type in the location of the report in the “ReportPath” field.
i.e. /MyReports/TheReport

The location is easy to know since it is the same path structure that you see in the Report Manager. Also, always be sure the put a forward slash first before the actual path.

Unless you want the ReportViewer to be an absolute size, go ahead and set the height and width settings under the “Layout” section to be 100%. The ReportViewer will by default show controls to set the parameters for the report. These often look a little ugly, and I would recommend most developers to create their own parameter controls. This can be done in the control bar row of the template provided above. To get rid of the ReportViewer’s parameter controls set the “ShowParameterPrompts” in the properties underneath “Appearance” to false. In, the next section I’ll show how you can set the report parameters with your own code.

Those should be all the settings you need to make for the ReportViewer to display correctly, unless your version of Visual Studio has other default settings. Double check to make sure the ASP.NET looks similar to this code:
<rsweb:ReportViewer ID="ReportViewer1" runat="server" Height="100%"
    ProcessingMode="Remote" ShowParameterPrompts="False" Width="100%">
    <ServerReport ReportPath="/MyReports/TheReport" />
</rsweb:ReportViewer>

Now, the report is ready to be processed. You can go ahead and preview your website and the report should generate just fine.


ASP.NET 4 Hosting - with ASPHostPortal.com :: Retrieving Image From SQL via Image Path in ASP.NET

clock March 13, 2014 12:04 by author Diego

In this article, we will explore how to store images in the database with the help of FileUpload Control and also how to display those images in asp.net GridView Control. For the purpose of this article I have created a table in SQL Server called Images, with three columns, Image Name, Image Type and the Image itself. Now let’s take a look at the form we are going to use, to upload images to this table.
The concept behind this technique is to store the images on disk in a folder that resides in the WebSite root directory while the relative path of the images along with filename is stored in SQL Server database.
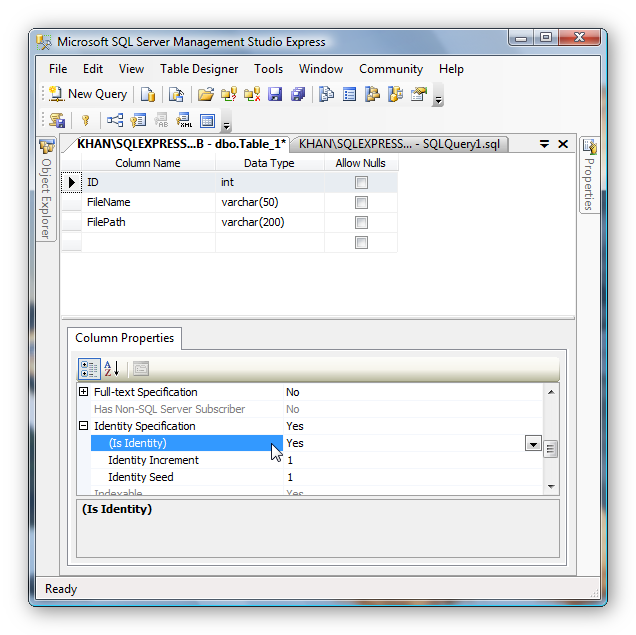
Let us start off by first creating a sample database and adding a table that will store the image path. The figure below describes the table structure.
set the ID field to auto increment using the identity property.
Next I’ll add a FileUpload and Button to the aspx page.
<div>
    <asp:FileUpload ID="FileUpload1" runat="server"/>
    <asp:Button ID="btnUpload" runat="server" Text="Upload"
        OnClick="btnUpload_Click" />

</div>

Adding a folder called "images" in my website root directory.
Adding a connection string key to the web.config which will be used to connect to the SQL server Database.
<connectionStrings>
  <add name="conString"

     connectionString="Data Source=.\SQLEXPRESS;database=GridDB;
       Integrated Security=true"/>
</connectionStrings >

Upload and Storing the Image Files. The snippet below gets executed when the upload button is clicked. It gets the uploaded image filename and saves the image in images folder. And then inserts the image file path into the database.protected void btnUpload_Click(object sender, EventArgs e){
    if (FileUpload1.PostedFile != null)

    {

        string FileName = Path.GetFileName(FileUpload1.PostedFile.FileName); 

        //Save files to disk

        FileUpload1.SaveAs(Server.MapPath("images/" +  FileName));

        //Add Entry to DataBase

        String strConnString = System.Configuration.ConfigurationManager

            .ConnectionStrings["conString"].ConnectionString;

        SqlConnection con = new SqlConnection(strConnString);

        string strQuery = "insert into tblFiles (FileName, FilePath)" +

            " values(@FileName, @FilePath)";

        SqlCommand cmd = new SqlCommand(strQuery);

        cmd.Parameters.AddWithValue("@FileName", FileName);

        cmd.Parameters.AddWithValue("@FilePath", "images/" + FileName); 

        cmd.CommandType = CommandType.Text;

        cmd.Connection = con;

        try

        {

            con.Open();

            cmd.ExecuteNonQuery();

        }

        catch (Exception ex)

        {

            Response.Write(ex.Message);

        }

        finally

        {

            con.Close();

            con.Dispose();

        }

    }

}

Display Images. Now the next job is to display the images in GridView control. As you can see the below GridView, I have added 2 Bound Fields which displays ID and File Name and a Image Field which displays the image based on the image path that comes from the database.
<div>
<br />

    <asp:GridView ID="GridView1" runat="server" AutoGenerateColumns = "false"

       Font-Names = "Arial" >

    <Columns>

       <asp:BoundField DataField = "ID" HeaderText = "ID" />

       <asp:BoundField DataField = "FileName" HeaderText = "Image Name" />

       <asp:ImageField DataImageUrlField="FilePath" ControlStyle-Width="100"

        ControlStyle-Height = "100" HeaderText = "Preview Image"/>

    </Columns>

    </asp:GridView>

</div>

The snippet below is used to display the images in the GridView control. As you will notice I am firing a simple select query and the returned datatable is then bind to the GridView Control.

protected void Page_Load(object sender, EventArgs e)
{

    DataTable dt = new DataTable();

    String strConnString = System.Configuration.ConfigurationManager.

        ConnectionStrings["conString"].ConnectionString;

    string strQuery = "select * from tblFiles order by ID";

    SqlCommand cmd = new SqlCommand(strQuery);

    SqlConnection con =  new SqlConnection(strConnString);

    SqlDataAdapter sda = new SqlDataAdapter();

    cmd.CommandType = CommandType.Text;

    cmd.Connection = con;

    try

    {

        con.Open();

        sda.SelectCommand = cmd;

        sda.Fill(dt);

        GridView1.DataSource = dt;

        GridView1.DataBind(); 

    }

    catch (Exception ex)

    {

        Response.Write(ex.Message);

    }

    finally

    {

        con.Close();

        sda.Dispose();

        con.Dispose();

    }

}

The GridView with images is shown in the figure below.

I hope you will enjoy reading this article you should have learned how to Retrieve images using a file path stored in database in ASP.Net that you can use in your own code. Stay tuned and stay connected for more technical updates with ASPHostPortal.


ASPHostPortal Web Hosting - Great Improvements from SQL Server 2005 until SQL Server 2014

clock March 4, 2014 10:20 by author Diego

Many New Features have been provided with the New SQL Server 2014. Microsoft SQL Server 2014 brings to market, new in-memory capabilities built into the core database, and provides new cloud capabilities to simplify cloud adoption for your SQL databases and help you unlock new hybrid scenarios. In this Blog I had provided these features in the way of difference between the older and New version of SQl Server.


New features or changes to existing features in Microsoft SQL Server 2014.

  • Memory-optimized Tables.  will help you quickly analyze your tables and walks you through reviewing and migrating disk-based table to In-Memory OLTP tables.
  • SQL Server Backup to URL
  • Encryption for Backups
  • New Design for Cardinality Estimation
  • Delayed Durability
  • AlwaysOn Enhancements
  • Business Intelligence Enhancement

The older version 2005, 2008 and 2012

  • SQL Server AlwaysOn. A high availability solution that increases application availability while also lowering total cost of ownership and making it easier to use.
  • Contained Databases, which intends to reduce or eliminate the dependencies that a database has on the SQL Server instance, making it easier to migrate a database to a new instance with less of the work involved in reproducing and validating these dependencies.
  • Web Development and Business Intelligence Enhancements. While business intelligence features were upgraded in SQL Server 2008 R2, Microsoft really improved Excel PowerPivot by adding more drill and KPI through.
  • ColumnStore Indexes. What a ColumnStore index does is essentially turn a traditional index on its side.
  • SQL 2008 also allows you to disable lock escalation on specific tables.
  • Transparent Database Encryption.  The ability to encrypt an entire database without having to change any code in your application adding an additional layer to your data security.
  • Intellisense in SQL Server Management Studio. Interactive help as you type giving object names and syntax support similar to Visual Studio.
  • In SQL 2005, even with the ROWLOCK hint on delete statements locks can be escalated which can lead to deadlocks. In my testing, an application which I have developed had concurrency issues during small table manipulation due to lock escalation on SQL 2005. In SQL 2008 this problem went away.

The new features are really great and its meets the very important factors of current age. For .Net people it's always be a boon to use SQL Server, I hope using the latest version we will have better security and better performance as well as the introduction of compression the size of the database. The backup encryption utility is also phenomenon.
Once again thanks to Microsoft for their great thoughts in form of software.


About ASPHostPortal.com

We’re a company that works differently to most. Value is what we output and help our customers achieve, not how much money we put in the bank. It’s not because we are altruistic. It’s based on an even simpler principle. "Do good things, and good things will come to you".

Success for us is something that is continually experienced, not something that is reached. For us it is all about the experience – more than the journey. Life is a continual experience. We see the Internet as being an incredible amplifier to the experience of life for all of us. It can help humanity come together to explode in knowledge exploration and discussion. It is continual enlightenment of new ideas, experiences, and passions

 photo ahp banner aspnet-01_zps87l92lcl.png

Author Link

Corporate Address (Location)

ASPHostPortal
170 W 56th Street, Suite 121
New York, NY 10019
United States

Sign in