Windows 2012 Hosting - MVC 6 and SQL 2014 BLOG

Tutorial and Articles about Windows Hosting, SQL Hosting, MVC Hosting, and Silverlight Hosting

Windows Server 2012 Hosting - ASPHostPortal.com :: Import IP Address with IPAM into Windows Server 2012

clock November 21, 2013 07:17 by author Ben

IPAM leverages an intuitive point- and-click web interface to allow you to Easily investigate the IP address space issues . By scanning the network , IPAM maintains a dynamic list of IP addresses and Allows engineers to plan for network growth , Ensure IP space usage meets corporate standards , and reduce IP conflicts .

IPAM is an entirely new feature in Windows Server 2012 that provides highly customizable administrative and monitoring capabilities for the IP address on a corporate network infrastructure or IPAM is the new framework for finding , monitoring and managing it on a network .

IPAM is a feature of Windows Server 2012 and must be installed as such , either by using the Add Roles and Features Wizard or through PowerShell 3.0 and poorly documented in my opinion , making a useful feature harder to use and understand than it should be .

Even without formal organization IPAM applications keep track of their IP address information somehow - most typically in spreadsheets . IPAM lets you view IP address availability and configuration from a database perspective , enabling you to use your addresses more efficiently . IPAM features such as IP reconciliation and automation can Eliminate the need to use spreadsheets for tracking addresses .

IPAM is performed on a Microsoft network by an installable feature of Windows Server 2012 that you run on a domain member server to " watch and centrally manage " the other servers on your network that are actually doing the work . IPAM manages the functionality of the following Windows servers :

  • DHCP Service
  • DNS Server
  • Network Policy Server ( NPS )
  • Active Directory Domain Controller ( DC )


To do import IPAM , IPAM log on to your server and open Server Manager :

  • Click IPAM in far left pane of Server Manager .
  • In the IPAM client , select IP Address Blocks under IP ADDRESS SPACE , and the make sure that Current view is set to IP Addresses in the drop - down menu .
  • If you look along the top window , you will see the IP address listed along the top fields , such as IP Address and IP Address State . You can add or remove fields by right-clicking on one of the existing fields .


If you want to import and Assignment Type yhis information , you need to add these fields to the first line of your import file , without spaces , as shown below :

IPAddress , IPAddressState , AssignmentType , ManagedByService , ServiceInstance , AssetTag

10.160.50.12 , In - Use , Static , IPAM , localhost , BR12

10.160.50.13 , In - Use , Static , IPAM , localhost , BR13

10.160.50.14 , In - Use , Static , IPAM , localhost , BR14

10.160.50.15 , In - Use , Static , IPAM , localhost , BR15

Alternatively , you can keep the spaces in the field names and enclose with quotation marks , for example , " IP Address" and " IP Address State " . The actual IP address of the data should then follow , comma delimited in the same order that you specified the fields as shown above .

Some fields , such as IP Address State , will require you to look and see what the options are valid input . To find out what the possible options are :

Click Tasks in the far right corner of this client and select Add IP Address from the menu .

Select the drop - down menu by the side of the field to see the possible options. For instance , the field can be set to In - Use , Inactive or Reserved .

Now we need to change the status of any discovered servers to Managed . To do this , right click a server in the Server Inventory screen and select Edit Server from the menu .

In the Add or Edit Server window , change the Manageability status to Managed and click OK . Right click the server again , and select Retrieve All Data Server from the menu . Repeat this procedure for all discovered servers . Now you are ready to add the IP addresses , ranges and blocks to IPAM .


Visual Studio 2010 Hosting :: Deploying a WPF Application Using Click-Once Deployment Technology in Microsoft Visual C# 2010 Express

clock November 14, 2013 05:07 by author Ben

Click -Once Enables Web - style application deployment for non - web applications. Applications are published to and deployed from a web or file servers . Although Click Once does not support the full range of features that client applications installed by the Windows Installer does , it does support a subset that includes the following :

  1. Integration with the Start menu and Programs Control Panel .
  2. Versioning , rollback , and Uninstallation .
  3. Online install mode , that always launches an application from the deployment location .
  4. Automatic updating when new versions are released.
  5. Registration of file extensions .

Before proceeding for the deployment , Ensure that your application has been built properly and ready for the deployment . Explains this article with respect to Game in a WPF and the game name is Mr . Gunner .

1.
In Solution Explorer, right-click the project name and select "Properties" as shown in the following snapshot.


2. After clicking on Properties a Publishing Window will open and it has various options, such as Application, Built, Security, Publish and so on. as you can see in the following snapshot.


3. To set an icon for your application, browse for the suitable icon for your application. To set the icon, click on the application and browse the icon (the icon should be a .ico file) , if you don't want to set an icon  for the application then it will be deployed with a default icon in your application as I highlighted with red circles in the following snapshot.


4: Then click on "Publish". Here select the publishing location nothing but browse the folder where you want keep the setup file and other application files and after selecting the publish location then click on the "Publish Wizard" to proceed as shown in the highlighted red circles.


5. After clicking "Publish" a wizard window will open, then click on the "Next" button as shown in the following snapshot:


6.  After selecting CD-ROM or DVD then click "Next" to proceed as shown in the following snapshot:


7. After selecting "Updates" Click "Next" to proceed to the final step as shown in the following snapshot.


8. Now, finally click on the "Finish" button to complete the Publish Wizard as shown in the following snapshot.


Finally, a setup file has been created on the selected folder. Now you can install the application on your system by clicking on the setup file. Have fun working with the installed application.


ASP.NET MVC Hosting - ASPHostPortal.com :: ASP.NET MVC Request Life Cycle

clock October 30, 2013 06:09 by author Ben

There are primarily seven stages in the ASP.Net Request Life Cycle :

1. Routing
Asp.net Routing is the first step in MVC request cycle. Basically it is a pattern matching system that matches the request’s URL against the registered URL patterns in the Route Table. When a matching pattern found in the Route Table, the Routing engine forwards the request to the corresponding IRouteHandler for that request. The default one calls theMvcHandler. The routing engine returns a 404 HTTP status code against that request if the patterns is not found in the Route Table. When application starts at first time, it registers one or more patterns to the Route Table to tell the routing system what to do with any requests that match these patterns. An application has only one Route Table and this is setup in the Global.asax file of the application.


2. MVCRouteHandler
MVC handler is responsible for initiating MVC applications. The MvcRouteHandler object creates an instance of the MvcHandler and passes the instance of RequestContext to MvcHandler.
MvcHandler is implemented from ITttpHandler and it cannot map as a handler. This class does not support a parameterless constructor. It takes RequestContext as a parameter.

3. Action Execution
Once the controller has been instantiated, Controller's ActionInvoker determines which specific action to invoke on the controller. Action to be execute is chosen based on attributes ActionNameSelectorAttribute (by default method which have the same name as the action is chosen) and ActionMethodSelectorAttribute(If more than one method found, the correct one is chosen with the help of this attribute).


ASPHostPortal.com is Microsoft No #1 Recommended Windows and ASP.NET Spotlight Hosting Partner in United States. Microsoft presents this award to ASPHostPortal.com for ability to support the latest Microsoft and ASP.NET technology, such as: WebMatrix, WebDeploy, Visual Studio 2012, ASP.NET 4.5, ASP.NET MVC 4.0, Silverlight 5 and Visual Studio Lightswitch. Click here for more information


4. Controller
MVCHandler receives a controller instance from the MVC controller factory (IControllerFactory). This controller handles further processing of the request. The MVCHandler object uses RequestContext (passed as a constructor parameter) instance to identify the IControllerFactory object to create the controller instance. The MvcHandler instance calls the Execute method of controller.


5. View Engine
View Result is responsible for selecting and involving the appropriate View Engine. A View Engine is responsible for rendering HTML to the browser. The View Engine template has different syntax to implement the view. Currently there are four builtin View Engines (Razor, ASPX, Spark and NHaml) supported by MVC. We can also create our own custom View Engine to render a view. All the View Engines may not be supported in all versions of MVC. We can also use multiple View Engines simultaneously in ASP.NET MVC.

6. View Result
The action method receives user input, prepares the appropriate response data, and then executes the result by returning a result type. The result type can be ViewResult, RedirectToRouteResult, RedirectResult, ContentResult, JsonResult, FileResult, and EmptyResult.


Visual Studio 2013 Free Trial Hosting :: New Features And Functionality Visual Studio 2013

clock October 28, 2013 06:02 by author Ben

Visual Studio 2013 is New versions of Visual Studio usually coincide with updates to the .NET Framework and one of our biggest releases yet. It comes purpose-built to help you thrive in an environment in which ideas are at a premium and speed is of the essence.


Now, let's have a look at what to expect from Visual Studio 2013.

1 . CodeLens
With CodeLens ( Code Information Indicators ) you can find code - related information faster and Easier . CodeLens works like a heads- up display in the code editor . With CodeLens you can :

  1. Find specific changes to code
  2. Find dependencies on specific code
  3. Find and run unit tests for specific code


2 . Performance and Diagnostics Hub

  1. JavaScript Memory . First Introduced in Visual Studio 2012 Update 1 , this tool helps you understand memory usage and find memory leaks in JavaScript Windows Store apps .
  2. HTML UI Responsiveness . First Introduced in Visual Studio 2012 Update 2 , this tool helps you isolate problems in JavaScript UI responsiveness Windows Store apps by providing rich visualizations of work being done on the UI thread .
  3. XAML UI Responsiveness . New in Visual Studio 2013 , this tool helps you understand UI responsiveness problems in C # / XAML and C + + / XAML Windows Store apps by providing rich visualizations of work being done on the UI thread .
  4. Energy Consumption . New in Visual Studio 2013 , this tool Enables you to estimate your app 's energy consumption without the need for any specialized hardware .


3 . roaming Settings
if you launch Visual Studio 2013 for the first time , you will get the dialog prompting you to sign -in . You can sign-in to Visual Studio 2013 using your Microsoft account ( hotmail.com , live.com , etc . ) . After you sign-in to Visual Studio 2013 , your settings are sync'd with your Microsoft account . Next time when you use Visual Studio 2013 on another computer , you can use the same Microsoft account to sign -in and find your settings applied to it .

4 . CodeMap
In Visual Studio 2013 , when you are in a debugging session , you will find an option called Code folder in the debug toolbar .


WCF Hosting Trial - ASPHostPortal.com :: Consuming AJAX-Enabled WCF Services from both Client and Server

clock October 24, 2013 11:38 by author Ben

This is a simple example of an Ajax-Enabled WCF Service (hosted in IIS) that can be consumed using both client-side and server-side code.

1. Add a WCF Service Application project to the solution called FooService

2. Delete everything in the service project’s web.config file.


a. Create a class file called FooServiceOne.cs
b. Replace the code with this:

using System;
using System.Collections.Generic;
using System.Linq;
using System.Web;
using System.ServiceModel;
using System.ServiceModel.Activation;
using System.ServiceModel.Web;

namespace GooberFoo.FooServices
{

    [ServiceContract(Namespace = "GooberFoo.FooServices")]
    public interface IFooServiceOne
    {
        [OperationContract]
        double Add(double n1, double n2);
    }

    [AspNetCompatibilityRequirements(RequirementsMode = AspNetCompatibilityRequirementsMode.Allowed)]
    public class FooServiceOne : IFooServiceOne
    {
        public double Add(double n1, double n2)
        {
            return n1 + n2;
        }
    }
}

c. Create another file called FooServiceOne.svc and past the following code into the file.

<%@ServiceHost
         language="C#"
         Debug="true"
         Service="GooberFoo.FooServices.FooServiceOne"
         Factory="System.ServiceModel.Activation.WebScriptServiceHostFactory"
 %>

d. Save and Compile

3. Host in IIS

a. Make sure "Enable anonymous access" is checked.
b. Make sure "Integrated Windows authentication" is unchecked.
c. Test the service by navigating to http://*******:90/FooServiceOne.svc
d. The service will be displayed with the message "Metadata publishing for this service is currently disabled."

4. Access the service from the client-side code

a. Create an Empty ASP.NET Web Application in your solution.
b. Drag and drop an AJAX Extensions ScriptManager control into your web page.
c. In the ServiceReference Collection Editor, set the path to http://********:90/FooServiceOne.svc
d. Drag and Drop an ASP.NET button and Label control on the page.

 <asp:Button ID="Button1" runat="server" OnClientClick="return Button1_Click();" Text="Add 5 and 7" />
 <asp:Label ID="Label1" runat="server" Text="Label"></asp:Label>

e. Add client-side script. 

<script language="javascript" type="text/javascript">
     function onSuccess(result) {
       document.getElementById('<%=Label1.ClientID %>').innerHTML = result;
     }
     function Button1_Click() {
       var proxy = new GooberFoo.FooServices.IFooServiceOne();
       proxy.Add(parseFloat(5), parseFloat(7), onSuccess, null, null);
       return false;
     }
 </script>

f. Compile and test.

5. Modify the service project to allow server-side code to consume the service

Change the service project's web.config file to look like this.

<?xml version="1.0"?>
        <configuration>
          <system.serviceModel>

            <bindings>
              <basicHttpBinding>
                <binding name="basicHttpBinding" closeTimeout="00:01:00"
                    openTimeout="00:01:00" receiveTimeout="00:10:00" sendTimeout="00:01:00"
                    allowCookies="false" bypassProxyOnLocal="false" hostNameComparisonMode="StrongWildcard"
                    maxBufferSize="65536" maxBufferPoolSize="524288" maxReceivedMessageSize="65536"
                    messageEncoding="Text" textEncoding="utf-8" transferMode="Buffered"
                    useDefaultWebProxy="true">
                  <readerQuotas maxDepth="32" maxStringContentLength="8192" maxArrayLength="16384"
                      maxBytesPerRead="4096" maxNameTableCharCount="16384" />
                  <security mode="None">
                    <transport clientCredentialType="None" proxyCredentialType="None"
                        realm="" />
                    <message clientCredentialType="UserName" algorithmSuite="Default" />
                  </security>
                </binding>
              </basicHttpBinding>
            </bindings>

            <behaviors>
              <serviceBehaviors>
                <behavior name="AspNetAjaxBehavior" >
                  <serviceMetadata httpGetEnabled="true" />
                </behavior>
              </serviceBehaviors>

              <endpointBehaviors>
                <behavior name="AspNetSOAPBehavior">
                </behavior>
              </endpointBehaviors>
            </behaviors>

            <services>
              <service name="GooberFoo.FooServices.FooServiceOne" behaviorConfiguration="AspNetAjaxBehavior" >
                <endpoint contract="IMetadataExchange" binding="mexHttpBinding" address="mex" />
                <endpoint address="soapreq" behaviorConfiguration="AspNetSOAPBehavior" bindingConfiguration="basicHttpBinding"
                          binding="basicHttpBinding" contract="GooberFoo.FooServices.IFooServiceOne" name="GooberFoo.FooServices.IFooServiceOne" />
              </service>
            </services>
          </system.serviceModel>
        </configuration>

6. Test the Service

a. In IE, open the URL http://*******:90/FooServiceOne.svc.
b. You will see the FooServiceOne Service page along with instructions to use svcutil.exe http://*******:90/FooServiceOne.svc?wsdl

7. Add the Web Reference to your asp.net web application

a. In your web application, "Add Service Reference".
b. Use http://GooberServer:90/FooServiceOne.svc?wsdl
c. Click Go.
d. Use FooServiceOneRef as the namespace.
e. Click OK.
f. View web application’s web.config file.

8. Use server-side C# code to consume the service in your web application

a. Add Button control to the page along with a button click event.

 <asp:Button ID="Button2" runat="server" Text="Add 10 and 13" onclick="Button2_Click" />

b. The button click event will look like this:

protected void Button2_Click(object sender, EventArgs e)
 {
   FooServiceOneRef.FooServiceOneClient mySvc = new FooServiceOneRef.FooServiceOneClient();
   Label1.Text = Convert.ToString(mySvc.Add(10, 13));
 }

c. Compile and test.


Windows Hosting - ASPHostPortal.com :: Assign IP Automatically and Manually to Client Machine

clock October 9, 2013 10:08 by author Ben

TCP / IP (which stands for Transmission Control Protocol / Internet Protocol ) is a data communications standard used by the Internet community in the process of exchanging data from one computer to another computer on the network Internet . This protocol can not stand alone , because this protocol is a set of protocols ( protocol suite ) . This protocol is the most widely used protocol today . Data are implemented in software ( software ) in the operating system . The term given to this software is the TCP / IP stack

TCP / IP was developed in the late 1970s and early 1980s as a standard protocol for connecting computers and networks to form a vast network ( WAN ) . TCP / IP is an open network standard that is independent of physical network transport mechanism that is used , so it can be used anywhere . This protocol uses a simple addressing scheme known as IP address ( IP Address) that allows up to several hundred million computers to be able to relate to each other on the Internet . This protocol is routable, which means that the protocol is suitable for connecting different systems ( such as Microsoft Windows and UNIX family ) to establish a heterogeneous network .


TCP / IP has always evolved over time , given the increasing demand for computer networks and the Internet . Development is done by several agencies , such as the Internet Society ( ISOC ) , the Internet Architecture Board ( IAB ) and the Internet Engineering Task Force ( IETF ) . Various protocol that runs on top of TCP / IP addressing scheme , and the concept of TCP / IP defined in documents called Request for Comments ( RFC ) issued by the IETF .

And now I wanna tell you
how to assign an IP automatically and manually to a client machineon windows.

1. open "Network and sharing Center" by clicking on the "Net Connection" Icon shown at the Task Bar.
2. Now your Control Panel window will be opened. Here in this window you will find an option for "Change Adapter Settings" that is on the extreme left hand side of the window. Click on this option.
3. Now your "Local Area Connection" will be opened. Right-click on this connection and click on "Properties".
4. Now the Property window for Local Area Connections will be opened. Here first you must select the "Internet Protocol Version 4" and then click on it's "Properties."

5. The Properties window of Internet Protocol Version 4 is the area where we will provide the IP Address either Automatically or Manually. For getting the IP Address Automatically click on the "Obtain IP Address Automatically and Obtain DNS Server Address Automatically" and then click on the "OK" Button.
But remember one thing; You can only provide the Automatic IP Address only if your Organization has a DHCP Server otherwise the Automatic option will not work.

6. In the previous step we obtain the IP Address Automatically but now we will provide the IP Address Manually. For this click on "Use the following IP Address and  Use the following DNS Server Address".


Now provide the IP Address, Default Gateway, Preferred DNS Server and Alternate DNS Server. The Subnet Mask will automatically appear after providing the IP Address. And Click OK.


Free ASP.NET hosting - ASPHostPortal.com :: ASPHostPortal.com Proudly Announces Free Trial Windows ASP.NET Hosting

clock October 3, 2013 10:28 by author Ben

ASPHostPortal.com is a premier Windows and ASP.NET Web hosting company that specializes in Windows and ASP.NET-based hosting. We proudly announces 7 Day Free Trial Windows and ASP.NET Hosting to all new customers. The intention of this FREE TRIAL service is to give our customers a "feel and touch" of our system. This free trial is offered for the next 7 days and at anytime, our customers can always cancel the service.


The 7 Day Free Trial is available with the following features:

- Unlimited Domains
- 5 GB Disk Space
- 60 GB of Bandwidth
- 2 MS SQL Database
- Unlimited Email Account
- Support ASP.NET 4.5
- Support MVC 4.0
- Support SQL Server 2012
- Free Installations of ASP.NET And PHP Applications

ASPHostPortal.com believes that all customers should be given a free trial before buying into a service and with such approach, customers are confident that the product / service that they choose is not faulty or wrong. Even we provide free trial service for 7 days, we always provide superior 24/7 customer service, 99,9% uptime guarantee on our world class data center. On this free trial service, our customer still can choose from our three different data centre locations, namely Singapore, United States and Amsterdam (The Netherlands)

Anyone is welcome to come and try us before they decide whether or not they want to buy. If the service does not meet your expectations, our customer can simply cancel before the end of the free trial period.

For all the details of packages available visit ASPHostPortal.com

About ASPHostPortal.com:

ASPHostPortal.com is a hosting company that best support in Windows and ASP.NET-based hosting. Services include shared hosting, reseller hosting, and sharepoint hosting, with specialty in ASP.NET, SQL Server, and architecting highly scalable solutions. As a leading small to mid-sized business web hosting provider, ASPHostPortal strive to offer the most technologically advanced hosting solutions available to all customers across the world. Security, reliability, and performance are at the core of hosting operations to ensure each site and/or application hosted is highly secured and performs at optimum level.


ASP.NET Hosting :: Using ADO.NET Entity Framework 4.1 with SQL Server Compact 4.0

clock September 30, 2013 07:01 by author Mike

ADO.NET Entity Framework, an object-relational mapper (ORM) built into the .NET framework, provides an easy way to map your classes into a database tables and vice versa.

SQL Server Compact (CE)
Yet another useful small scale tool. Of course you can map your entities into a full robust database. There are a number of pre-built providers, not counting Microsoft SQL and SQL Express (the default). I've chosen to use MS SQL Server Compact as a first option (later to be replaced or give the user/administrator the option to set a different provider) mainly because it's super-lightweight, builds the database in a file, and does not require heavy installation and licenses. It's free and is supported by mobile devices. For small applications it may be sufficient. For larger scale apps perhaps not so much.

Prerequisites checklist

  • ADO.NET Entity Framework 4.1, available here.
  • Microsoft SQL Server Compact 4.0, available here.
  • MS SQL Server CE has no fancy management application (like MS SQL Server Management Studio for more robust SQL Server versions) and it is not natively browsable from Visual Studio. 
    However, in order to query your tables and see what's going on, I recommend using SQL Server Compact Toolbox Visual Studio extension, available here.
    Mind you that in order for it to run properly, you will need to have both SQL Server CE 4.0 (from the link above) and the SQL Server CE 3.5 SP2 runtime from here installed on your machine.
    If you are running a 64 bit version of Windows, you will have to download, extract and install both the 32 bit and the 64 bit versions of the SQL Server CE 3.5 SP2.

Project references
Once all prerequisites are in place, the following assembly references are to be added to the project:

  • EntityFramework
    Should reside in the folder where the Microsoft ADO.NET Entity Framework 4.1 has been installed. By default it would be something like:
    C:\Program Files (x86)\Microsoft ADO.NET Entity Framework 4.1\Binaries\
  • System.ComponentModel.DataAnnotations
    This is required in order to use data attributes for annotating your persisted class properties, such as [Key] to denote a primary key property.

Code first: Data classes
The approach I'm implementing here assumes you have the data classes created first, and wish to map those into database tables. There are ways to implement in the opposite direction, meaning you have your database and wish to create corresponding classes ("Model first"). I'll use a simple structure of a Person class and Company class.
The simpler of the two is the company class, which consists of 2 properties: an ID and a name.

public class Company
{
    public Company()
    {
 
    }
 
    public Company(Guid companyId, string companyName)
    {
        this.CompanyId = companyId;
        this.CompanyName = companyName;
    }
 
    [KeyColumn(Order =1)]
    public Guid CompanyId { getset; }
 
    [KeyColumn(Order = 2)]
    public string CompanyName { getset; }
}

A few points to note, though:

  • Notice it has an empty default constructor with no arguments. Even if this constructor does nothing, it is required for reconstructing the object once it's fetched back from the database.
  • For this example, I've defined  both public properties, CompanyId and CompanyName as parts of a compound primary key.  It is also necessary to order the key parts as demonstrated here.

For this demo, I've also included a simple enum. Enums were quite clumsy to use in previous CTP versions of the Entity Framework, but as of version 4.x they are supported more easily.
Hence the following enum is also defined:

public enum Prefix 
{ 
    Mr,
    Ms,
    Mrs,
    Dr
}


The Person class:

public class Person
{
    public Person()
    {
 
    }
 
    public Person(Guid personId, string name, int age, Prefix pref, Company workplace)
    {
        this.PersonId = personId;
        this.Name = name;
        this.Age = age;
        this.NamePrefix = pref;
        this.Workplace = workplace;
    }
 
    [Key]
    public Guid PersonId { getset; }
 
    public string Name { getset; }
 
    public int Age { getset; }
 
    public Company Workplace { getset; }
 
    [Required]
    public virtual Prefix NamePrefix { getset; }
 
    public virtual int NamePrefixId
    {
        get { return (int)NamePrefix; }
        set { NamePrefix = (Prefix)value; }
    }
}


  • A more complex class. It has a member of type Company.
  • It has 2 member properties: NamePrefix and NamePrefixId, which relate to the enum of type Prefix. The NamePrefixId member is a helper for translating the enum to/from int, which is the actual underlying type which will be stored in the database.
  • It also has an empty default non-argumentative constructor for the sake of reconstructing the retrieved object.

Database context
This class is required as a management context for our persisted objects against the framework. It inherits DbContext and its properties, which are of the generic DbSet type represent the queryable collections of the persisted objects.

public class PersonsContext : DbContext
{
    public PersonsContext()
        : base(PersonsContext.ConnectionString)
    {
    }
 
    public DbSet<Person> Persons { getset; }
    public DbSet<Company> Companies { getset; }
 
    public static string ConnectionString
    {
        get
        {
            return @"Data Source=" + 
                System.Reflection
                    .Assembly
                    .GetExecutingAssembly()
                    .Location
                    .Substring(0, 
                        System
                        .Reflection
                        .Assembly
                        .GetExecutingAssembly()
                        .Location
                        .LastIndexOf("\\") + 1) 
                + @"\\people.sdf";
        }
    }
}

Furthermore:

  • Notice the constructor.
    It invokes the base class constructor, providing a simple connection string to our database.
    It could have also provided the name of a connection string from the App.Config file, or it could provide no connection string at all (in which case our database would be created on the local instance of SQL Express, with a name similar to our executing application.
  • The connection string provided here corresponds with MS SQL Compact, and refers to a database file, people.sdf, which is expected to be created/found on the same folder of our application's assembly (If debug/run the solution from Visual Studio, the folder would be Bin\Debug by default)

Showing the seeds
Many times when we run a newly built database-oriented application, we'd want to start with some predefined data already stored in the database. If we generate the database manually with some SQL script, we could easily include some INSERT statements in order to generate and store the initial data. In the case of Entity Framework, we can generate and store our initial data by creating the following class:

public class DatabaseInitializer : CreateDatabaseIfNotExists<PersonsContext>
{
    protected override void Seed(PersonsContext context)
    {
        Company telerik = new Company(Guid.NewGuid(), "Telerik");;
        Person alon = new Person(Guid.NewGuid(), "Alon", 38, Prefix.Mr, telerik);
 
        context.Companies.Add(telerik);
        context.Persons.Add(alon);
 
        context.SaveChanges();
    }
}

Notice:

  • This class inherits the generic CreateDatabaseIfNotExists class. This is the default policy of the Entity Framework (to create the database if it does not already exist). Other options are listed on the MSDN library.
  • We override the Seed method, and populate the context argument with our predefined objects. Once the new database is created, this data should be automatically inserted into the underlying tables. In this case, one company (telerik) and one person (alon) are created and seeded.

Helper classes

Now almost everything is in its right place. We will need to tie everything together, though. I love helper classes. They are just so damn helpful. I've created this helper class in order to simplify and wrap the interaction with the data context nicely.

public class DataManager
{
    public static PersonsContext DataContext
    {
        get
        {
            if (DataManager.dataContext == null)
            {
                Database.DefaultConnectionFactory = new SqlCeConnectionFactory("System.Data.SqlServerCe.4.0");
                DataManager.dataContext = new PersonsContext();
                bool dbExists = DataManager.dataContext.Database.Exists();
                if (dbExists)
                {
                    //UpgradeScript();
                }
                if (!dbExists)
                {
                    Database.SetInitializer(new DatabaseInitializer());
                }
                else
                    Database.SetInitializer<PersonsContext>(null);
            }
            return DataManager.dataContext;
        }
    }
    private static PersonsContext dataContext = null;
}

About this class:

  • The main purpose here is to statically cache (in memory) and manage our PersonsContext object. A few important settings are also applied here:Setting the default database factory to SQL Server Compact (SqlServerCe).
  • If the database does not exist, an initializer of type DatabaseInitializer is assigned. That is, the seeding class defined above will kick in and create the persisted entities in the database.
  • If the database already exists, no initializer is assigned, but I'm leaving the option to run upgrade scripts (i.e. check the version of our data and apply changes in the database schema according to changes in our persisted classes and/or seeded data to match the current product version) if they are needed.
    Those should manipulate tables, and need to be run directly against the database.

Manipulations
To demonstrate the ease of use of this shameless production and manipulation through basic CRUD operations, I've constructed a small console application. Here is its main function:

class Program
{
    static void Main(string[] args)
    {
        //Check seeding:
        Console.WriteLine("{0} persons are in your database.\n"DataManager.DataContext.Persons.Count());
 
        //Basic CRUD operations:
 
        //C(reate)
        if (DataManager.DataContext.Companies.FirstOrDefault(
        c => c.CompanyName == "Microsoft") == null)
        {
            DataModel.Company microsoft = new DataModel.Company(Guid.NewGuid(), "Microsoft");
            DataManager.DataContext.Companies.Add(microsoft);
            DataManager.DataContext.Persons.Add(new DataModel.Person(
                Guid.NewGuid(), 
                "John doe", 
                20, 
                DataModel.Prefix.Dr, 
                microsoft));
            DataManager.DataContext.Persons.Add(new DataModel.Person(
                Guid.NewGuid(), 
                "Klark Kent", 
                30, 
                DataModel.Prefix.Dr, 
                microsoft));
            DataManager.DataContext.SaveChanges();
        }
 
        //R(ead)
        IQueryable<DataModel.Person> microsoftWorkers = DataManager.DataContext.Persons.Where(
            person => person.Workplace.CompanyName == "Microsoft");
        Console.WriteLine("{0} persons are working in Microsoft.\n", microsoftWorkers.Count());
 
        //U(pdate)
        DataModel.Person johnDoe = DataManager.DataContext.Persons.FirstOrDefault(
            p => p.Name == "John Doe");
        if (johnDoe != null)
        {
            johnDoe.Name = "Changed Name";
            DataManager.DataContext.SaveChanges();
        }
 
        //D(elete)
        DataModel.Person klark = DataManager.DataContext.Persons.FirstOrDefault(
            p => p.Name == "Klark Kent");
        if (klark != null)
        {
            DataManager.DataContext.Persons.Remove(klark);
            DataManager.DataContext.SaveChanges();
        }
            
        //Done.
        Console.ReadKey();
    }
}


Where is my data?
As written in the prerequisites section above, I'm using the very comfortable SQL Server Compact Toolbox Visual Studio extension.
Once installed, it can be accessed through the Tools menu:

Connecting to your database file is then extremely simple:
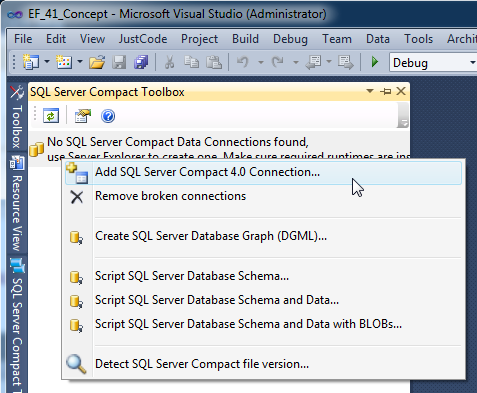
In the dialog, browse to select your created SDF database file, the connection string will be automatically created:

And you can now browse through your database and run queries like any civilized respectful person would do, if they were you:

A query execution window will open


ASP.NET Hosting - IIS 7.5 Hosting - ASPHostPortal.com :: Configure Costum Error in IIS 7.5 With ASP.NET

clock September 21, 2013 09:17 by author Ben

Now, I will explain how to configure custom error pages in IIS (Internet Information Service). For this example we will be using IIS 7.5 which shipped with Windows Server 2008 R2.

First Step, Open Internet Information Services (IIS) Manager.  Select your website. Note: This could also be set at the server level and applied to all sites on the server. DoubleClick on the “.NET Error Pages” icon.


The .NET Error Pages features view will be displayed.


Click the “Edit Feature Settings” link to enable this feature. The “Edit Error Page Settings” dialog box will appear.


How to determine the error code 404 explicitly..

First, On the .NET Error Pages Actions menu click the Add link.


The “Add Custom Error Page” dialog will appear. This is where we define individual error pages per status code. For our example we will add a custom page for the HTTP 404 Error.


Now that we have turned on the feature and added a custom page for the 404 status code we can verify it is working. Please reload your website.

As mentioned above this can also be managed from the site’s web.config file. Consider the following configuration section from our site’s web.config file.


ASP.NET Hosting - ASPHostPortal :: How to Resolve "~/Telerik.Web.UI.WebResource.axd' is missing in web.config"

clock September 13, 2013 08:23 by author Mike

Problem 1:
When attempting to run an application that uses certain Telerik controls, you may run into the error below:

System.InvalidOperationException:
‘~/Telerik.Web.UI.WebResource.axd’ is missing in web.config.
RadStyleSheetManager requires a HttpHandler registration in web.config. Please,
use the control Smart Tag to add the handler automatically, or see the help for
more information: Controls > RadStyleSheetManager at
Telerik.Web.UI.RadStyleSheetManager.OnPreRender(EventArgs e) at
System.Web.UI.Control.PreRenderRecursiveInternal() at
System.Web.UI.Page.ProcessRequestMain(Boolean includeStagesBeforeAsyncPoint,
Boolean includeStagesAfterAsyncPoint)


Solution:
I’ve seen that error on new DotNetNuke installations but it certainly isn’t specific to DNN, nor is it a problem with the Telerik controls. The issue is that the Integrated Pipeline Mode and Classic Modes handle the registration slightly differently within the web.config file.
To resolve this error you can make changes to your web.config file, or, a perhaps faster and easier solution, is to change your site’s ASP.NET version to Classic Mode – both seem to work equally well.

Problem 2:
When you place RadScriptManager on aspx page and compile it gives error like, 

" '~/Telerik.Web.UI.WebResource.axd' is missing in web.config. RadScriptManager requires a HttpHandler registration in web.config. 
Please, use the control Smart Tag to add the handler automatically, or see the help for more information: Controls > RadScriptManager "


Solution:
Its Simple And fast you Just Have to register The radScriptmanager and it will modify the web config file automatically.

  • Click RadScriptManager Menu Cursor .It Will Display RadScript Manager Tasks click on Regiter Telerik.Web>UI.WebResource.axd
Telerik.Web.UI.WebResource.axd
  • Telerik.WebUI.WebResources.axd Is Now Succeessfully Register in Web Config.

    Telerik.Web.UI.WebResource.axd


About ASPHostPortal.com

We’re a company that works differently to most. Value is what we output and help our customers achieve, not how much money we put in the bank. It’s not because we are altruistic. It’s based on an even simpler principle. "Do good things, and good things will come to you".

Success for us is something that is continually experienced, not something that is reached. For us it is all about the experience – more than the journey. Life is a continual experience. We see the Internet as being an incredible amplifier to the experience of life for all of us. It can help humanity come together to explode in knowledge exploration and discussion. It is continual enlightenment of new ideas, experiences, and passions

 photo ahp banner aspnet-01_zps87l92lcl.png

Author Link

Corporate Address (Location)

ASPHostPortal
170 W 56th Street, Suite 121
New York, NY 10019
United States

Sign in