Windows 2012 Hosting - MVC 6 and SQL 2014 BLOG

Tutorial and Articles about Windows Hosting, SQL Hosting, MVC Hosting, and Silverlight Hosting

Windows Hosting - ASPHostPortal.com :: Windows Server 2008 Security Considerations

clock November 14, 2016 08:55 by author Dan

According to searchwindowsserver.techtarget website, Many strides were taken to make Windows Server 2008 a more secure operating system than its predecessors. This section takes a look at some of these enhancements, and provides advice on how admins can further harden there servers in certain areas.

Network Access Protection: Should you care?
While NAP might not be as flashy as some of Windows Server 2008's other new features, admins shouldn't overlook the security benefits it has to offer. This article breaks down how NAP works in the operating system.

Simple NAP Implementation

The installation process for Network Access Protection with Windows 2008 is easier than you think. Learn the basics of implementing NAP in your environment.

Security concerns with Server Core
Some of the lost functionality that goes with Server Core installations can make the OS a bit more difficult to properly secure. Follow these steps to ensure peak security when running Server Core, with advice on anti-malware, patching and command-line tools.

Windows PowerShell: A backdoor to malware?
One of the key benefits of Windows Server 2008 is that is comes with Windows PowerShell built in. However, if configured incorrectly this boon can quickly become a security liability. This tip explains how to avoid turning PowerShell into an entry point for malware.

Security in Windows Server 2008 R2
Security is often a top concern for admins moving to a new or updated operating system. Find out how Windows Server 2008 R2 beefs up protection.

Best Windows Server 2016 Hosting Recommendation

ASPHostPortal.com provides our customers with Plesk Panel, one of the most popular and stable control panels for Windows hosting, as free. You could also see the latest .NET framework, a crazy amount of functionality as well as Large disk space, bandwidth, MSSQL databases and more. All those give people the convenience to build up a powerful site in Windows server 2016. We offers Windows hosting starts from $5/month only. We also guarantees 30 days money back and guarantee 99.9% uptime. If you need a reliable affordable Windows server 2016 Hosting, we should be your best choice.


Windows hosting - ASPHostPortal.com :: How to setup a Node.JS development environment on Windows

clock November 14, 2016 07:10 by author Armend

How to setup a node.js development environment on Windows

It’s easy to install node.js on Windows, just go to node.js official site and download Windows installer, then execute the installer. Congratulations!!! You successfully installed node.js on Windows!!!


Install mongoDB

Go to mongoDB official site to download zip file for Windows, and unzip the contents to anywhere you like. MongoDB will read data at \data\db by default, but mongoDB won’t create this folder for us, so we must create it by ourself, you can create this folder in Windows Explorer, or type the following command in terminal:

C:\> mkdir \data
C:\> mkdir \data\db

After creating \data\db, double click mongod.exe in your_mongodb_path\bin or type the following command in terminal to turn on mongoDB:

C:\> cd your_mongodb_path\bin
C:\> mongod

Then you can double click mongo.exe or type the following command in terminal to get into administrative shell:

C:\> cd your_mongodb_path\bin
C:\> mongo

Congratulations!!! You’ve successfully installed node.js and mongoDB on Windows!!!

Update node.js

Go to node.js’s official site and download Windows installer, then execute the installer. Then your node.js is updated.

Update mongoDB

Go to mongoDB official site to download zip file for Windows, and use the files in new zip file, then you can start to use the latest mongoDB. If you have question about installng or using mongoDB, you can check the Windows Quick Start on mongoDB official site :)

Setup a node.js development environment on other OS

If you want to setup a node.js development environment on Mac OSX Lion or Ubuntu 11.04, you can take a look at:

  • How to setup a node.js development environment on Mac OSX Lion
  • How to setup a node.js development environment on Ubuntu 11.04.

npm commands and node.js basics

Now you have setup a clean node.js development environment. Let’s have a quick look at how to use npm and learn some basics of javascript and node.js.

Best Windows Server 2016 Hosting Recommendation

ASPHostPortal.com provides our customers with Plesk Panel, one of the most popular and stable control panels for Windows hosting, as free. You could also see the latest .NET framework, a crazy amount of functionality as well as Large disk space, bandwidth, MSSQL databases and more. All those give people the convenience to build up a powerful site in Windows server 2016. We offers Windows hosting starts from $5/month only. We also guarantees 30 days money back and guarantee 99.9% uptime. If you need a reliable affordable Windows server 2016 Hosting, we should be your best choice.


Windows Hosting - ASPHostPortal.com :: Hidden Features In Windows RDP Allows Its Widespread Usability And Popularity

clock November 7, 2016 10:58 by author Dan

According to Sanjay Joshi (internet marketer) article, Remote desktop protocol in simple terms is a proprietary tool, which belongs to Microsoft and is also distributed by authorized partners. This protocol allows the user of Microsoft windows server to interact with another computer using the same graphics or operating system. It provides remote display and input capabilities across widespread network connections where the windows based applications are running on a server.

Multiple LAN protocols can be supported by the RDP instruments. Usually all the RDP works on and are based on ITU T.120 family of protocols. This protocol allows for separate virtual channels for carrying device communication and presentation data from the server. Also, these protocols are spread across encrypted servers and data.

The windows RDP is specialist of an extensible base and supports up to 64,000 separate channels for transmission of data. The rdp has the potential to use its own video driver to construct its own information pockets along the network and lets them pass to the client computers. It is because of the RDP that the commands from the mouse and keyboards reach the server which is read through the Microsoft windows graphics device interface.

The simplest formats of the windows RDP applicability are the enabling and disabling the color combinations and the wallpaper, through the TCP connection. It is the wide range of RDP features that has brought so many of enthusiasts to take advantage of remote desktop protocol.

Encryption is the most important and the top of the list feature. Due to the encryption over a secure communications across networks, many administrators are choosing the windows desktop protocol. The data can be reduced by the help of the RDP by data compression, persistent caching of bitmaps and fragments in RAM.

The lower cache provides a substantial lowering of the bandwidth at which the windows system can work. The ability to connect or disconnect from a remote device is a functionality that is possible and is perhaps the most attractive feature of the RDP. This is particularly advantageous when the sudden logging off occurs. Users have the advantage of deleting, copying and pasting text and graphics between applications running on the local or remote computers.

Applications running within a remote desktop can be printed on a printer that is fixed to the client computer. The remote desktop protocol has allowed the client device to develop new and augmented applications and new features can be added. With the help of remote desktop protocol, remote management of different computers is possible.

Sharing inputs and displaying graphics between two different remote desktops can be done which allows the support staff to diagnose and resolve a problem from a remote location. Lastly, the remote connection can be used to shed of the excessive load due to the networking. These are the features that can be implemented and taken advantage of by the use of RDP. Those clients, who are able to do this, can resolve a number of issues that pertain to the computer use. And all these without the need to be physically present near the computer.

Best Windows Server 2016 Hosting Recommendation

ASPHostPortal.com provides our customers with Plesk Panel, one of the most popular and stable control panels for Windows hosting, as free. You could also see the latest .NET framework, a crazy amount of functionality as well as Large disk space, bandwidth, MSSQL databases and more. All those give people the convenience to build up a powerful site in Windows server 2016. We offers Windows hosting starts from $5/month only. We also guarantees 30 days money back and guarantee 99.9% uptime. If you need a reliable affordable Windows server 2016 Hosting, we should be your best choice.


Windows Hosting - ASPHostPortal.com :: 10 Features in Windows Server 2016 sysadmins

clock November 7, 2016 06:55 by author Armend

The newest release of Microsoft’s server operating system, Windows Server 2016, hit general availability on September 26th, along with System Center 2016. We’ve been hearing about new and improved things coming in Windows Server 2016 for months, so you most probably know about the container support and the improved security and networking tools. Maybe you’ve even used some of them in the technology preview versions.
But in case you’ve been holding out for GA, or your working day consisting of endless tickets simply doesn’t allow you to find time to tryout betas and technology previews, we’ve prepared a closer look at the top 10 features in Windows Server 2016 that every sysadmin needs to know about.


Server footprints get even smaller with Nano

The next evolution of Server Core – Nano Server, is an even more thinned down version of Windows Server 2016. A Nano server must be managed remotely and can only run 64 bit applications, but it can be optimized for minimum resources, requires far less patching, restarts very quickly, and can perform a number of specific tasks very well with minimal hardware.
Good uses for Nano Server include IIS, DNS, F&P, application servers, and compute nodes. So if you liked Server Core, you will love Nano; and if you never really understood Server Core, you should give Nano a chance, especially if patching and downtime are challenges in your 24×7 shop.

Improved server management with PowerShell 5.0

Windows Server 2016 comes with PowerShell 5.0, a part of the Windows Management Framework 5.0.
including support for developing your own classes, or a new module called PackageManagement, which lets you discover and install software packages on the Internet.
The Workflow debugger now supports command or tab completion, and you can debug nested workflow functions. To enter it in a running script you can now press Ctrl+Break, in both local and remote sessions, and also in a workflow script. And PS5 now runs in Nano server directly, so administration of this lightweight server platform is made even simpler.

Versatile container support for enhanced density

Windows Server 2016 offers two kinds of containers to improve process isolation, performance, security, and scalability. Windows Server Containers can be used to isolate applications with a dedicated process and a namespace, while Hyper-V Containers appear to be entire machines optimized for the application.
Windows Server Containers share a kernel with the host, while Hyper-V Containers have their own kernel, and both enable you to get more out of your physical hardware investments. On top of this, Microsoft announced that all Windows Server 2016 customers will get the Commercially Supported Docker Engine for no additional cost, enabling applications delivered through Docker containers to run on Windows Server on-premise installations or in the cloud, on Azure.

More secure identity management

WS2016 brings some huge improvements to Active Directory, security, and identity management, such as Privileged Access Management (PAM), restricting privileged access within an existing Active Directory environment. In this model you have a bastion forest, sometimes called a red forest, that is where administrative accounts live and which can be heavily isolated to ensure it remains secure. Just-in-Time administration, privileged access request workflows, and improved audition are all included, and best of all – you don’t have to replace all of your DCs to take advantage of this.

Simplified administrative work

“Just Enough Administration” is a new capability in Windows Server 2016 that enables administrators to delegate anything that can be managed through PowerShell. Do you have a developer who needs to be able to bounce services or restart app pools on a server, but not log on or make any other changes? With JEA you can give him or her exactly those abilities, and nothing more. Of course, you may have to write some PS1s to let them actually do that, but the point is that now you can.

Improved HA remote desktop management

Customers who want to set up highly-available RDS environments, but not go to the trouble and expense of setting up HA SQL, can now use an Azure SQL DB for their Remote Desktop Connection Broker, making it both easier and less expensive to set up a resilient virtual desktop environment.
The RD Connection Broker can now handle massively concurrent connection situations, commonly known as the “log on storm”, and it has been tested to handle more than 10k concurrent connection requests without failures.

Software-defined storage for easier management

Software-defined storage enables you to create HA data storage infrastructures that can easily scale out, without breaking the bank. With software defined storage, even SMBs can start to take advantage of high availability storage with the existing budgets.
Three new features take over the stage: Storage Spaces Direct enables you to combine commodity hardware with availability software, providing performance for virtual machines, Storage Replica replicates data at the volume level in either synchronous or asynchronous modes, while Storage QoS guards against poor performance in a multitenant environment.

Time slips into more accuracy

If you have set up an NTP server on your network, or subscribed to NTP services from an NTP pool, you know how important accurate time can be. Typically, Windows environments were less worried about accurate time, and more concerned with a consensus of time, with a five-minute drift being acceptable.
Now in Windows Server 2016, the new time service can support up to a 1ms accuracy, which should be enough to meet almost all needs – if you need more accuracy than that, you probably own your own atomic clock.

Connection flexibility with software-defined networking

Immensely valuable in a virtualization environment, software-defined networking enables administrators to set up networking in their Hyper-V environment similar to what they can in Azure, including virtual LANs, routing, software firewalls, and more.
You can also do virtual routing and mirroring, so you can enable security devices to view traffic without expensive taps.

Boosted security

There are so many security improvements in Windows Server 2016 that we could do an entire post just on that, which, as a matter of fact, we will in the coming weeks. For now, be aware that WS2016 includes improvements to protect user credentials with Credential Guard and Remote Credential Guard, and to protect the operating system with Code Integrity, with a whole host of improvements with virtual machines, new antimalware capabilities in Windows Defender, and much more.

Best Windows Server 2016 Hosting Recommendation

ASPHostPortal.com provides our customers with Plesk Panel, one of the most popular and stable control panels for Windows hosting, as free. You could also see the latest .NET framework, a crazy amount of functionality as well as Large disk space, bandwidth, MSSQL databases and more. All those give people the convenience to build up a powerful site in Windows server 2016. We offers Windows hosting starts from $5/month only. We also guarantees 30 days money back and guarantee 99.9% uptime. If you need a reliable affordable Windows server 2016 Hosting, we should be your best choice.


Windows Hosting - ASPHostPortal.com :: How to implement Windows authentication and authorization in ASP.NET

clock October 31, 2016 08:47 by author Armend

How to implement Windows authentication and authorization in ASP.NET

This step-by-step article describes how to implement Windows authentication and authorization in an ASP.NET application. To use the built in security of Windows and ASP.NET, implement Windows authentication and authorization on groups and users. To use Windows authentication, you must adjust settings in both Microsoft Internet Information Services (IIS) and the ASP.NET application Web.config file.

Requirements

  • Microsoft Windows 2000 Professional, Windows 2000 Server, Windows 2000 Advanced Server, or Windows XP Professional
  • Microsoft .NET Framework
  • Microsoft Internet Information Services (IIS)
  • Microsoft Visual Studio .NET

Authentication and authorization

Windows authentication and Windows authorization are two terms that are frequently interchanged. However, they do not have the same meaning. Windows authentication permits the recipient to determine the user's identity. Windows authorization determines the resources to which a user may gain access.

Configure Web application for Windows authentication

To configure your Web application for Windows authentication, follow these steps:

  • Create an ASP.NET Web Application named ASPNETWinAuth. By default, theWebForm1.aspx file appears.
  • In the HTML view of WebForm1.aspx, replace the existing code with the following sample code:

    <%=User.Identity.Name%>

  • Click Start, point to Programs, point to Administrative tools, and then click Internet Information Services.
  • The Internet Information Services MMC appears. Expand Computer, and then expand a Web site that uses Windows authentication.
  • Click the ASPNETWinAuth Web site application.
  • On the Action menu, click Properties.
  • In Properties, click the Directory Security tab.
  • Under Anonymous access and authentication control, click Edit.
  • In Authentication Methods, click to select Integrated Windows authentication. Click to clear all other check boxes.
  • Click OK.
  • In Properties, click OK. The ASPNETWinAuth Web application is now configured to accept valid user accounts.

Configure the ASP.NET application

After you configure the IIS Web site for Integrated Windows Authentication, you must configure the ASP.NET application to recognize authenticated users. To do this, you must change the Web.config file. In the Web.config file, locate the <authentication> tag, and then set the mode attribute to Windows, as in the following example:

<authentication mode="Windows" />

Test authentication

To test your Windows authentication setting, follow these steps:

  • In Microsoft Internet Explorer, view the WebForm1.aspx page. This page is located in the Http://Localhost folder. For example:

    http://Localhost/ASPNETWinAuth/WebForm1.aspx

  • Because Integrated Windows Authentication uses the current Windows user information on the client computer for the authentication, it does not immediately prompt the user for a user name and password. However, if the authentication exchange cannot identify the user, a dialog box appears that prompts the user for a Windows user account user name and password.
  • Type a valid user name and password. When the page loads, your user name appears in the following format:

    Domain Name\User Name

Restrict access

In ASP.NET, you set authorization to the application by adding settings in the Web.config file. You can specify which users or groups are permitted to have access to what resources as follows:
To permit all users of an NT Group named Managers to have access to your resources, use the following code:

<configuration>
      <system.web>
        <authorization>
          <allow roles="domainname\Managers" />
          <deny users="*" />
        </authorization>
      </system.web>
    </configuration>

To permit only specific users to have access, use the following code:

<configuration>
      <system.web>
        <authorization>
          <allow users="domainname\user1,domainname\user2,domainname\user3" />
          <deny users="*" />
        </authorization>
      </system.web>
    </configuration>

Note You can specify multiple roles or users by using a comma separated list. Verify that you use the correct case when you specify the configuration file element and the associated attribute values. This code is case sensitive.


Best Windows Server 2012 Hosting Recommendation

ASPHostPortal.com provides our customers with Plesk Panel, one of the most popular and stable control panels for Windows hosting, as free. You could also see the latest .NET framework, a crazy amount of functionality as well as Large disk space, bandwidth, MSSQL databases and more. All those give people the convenience to build up a powerful site in Windows server 2012. We offers Windows hosting starts from $5/month only. We also guarantees 30 days money back and guarantee 99.9% uptime. If you need a reliable affordable Windows server 2012 Hosting, we should be your best choice.


Windows Hosting - ASPHostPortal.com :: Easy Steps to Install Windows Server 2008 on a Bootable USB

clock October 31, 2016 08:36 by author Dan

According to Donald M Clark (web developer) article, When a file gets deleted it goes to the trash, right? If you don't want anyone to restore these files, emptying the recycle bin seems to be the best way to make it unrecoverable. This is not the end of your file yet. Because what actually happens when you empty your trash, is it just removes the index of the file. In Windows Server 2003, Disk Management can not directly change partition size. But you can use other utility to realize it. One is the "disk part.exe" utility built-in Windows server 2003. It can manage disks both Basic and Dynamic, partitions, and volumes. This utility has a command-line interface, so users need to know the correct command.

Registries are Windows's internal database. All sort of information are stored there, from hardware and drivers info to applications' settings. After each removal of any device, like a printer or video card, pieces of information remain there. The biggest problem is when you uninstall a program. Unfortunately, many applications fail to erase all their data on removal. A solution for this is to run "regedit" and manually search for all references to the program and erase them. size is specified in megabytes (MB). If the user does not specify, the system will add all continuously space to extend the partition. For dynamic disk, if no disk number is defined, the volume will extend on the current disk. If the user type "no error", when an error occur, disk part will continue to process commands as if the error did not occur.

By hardware management I mean memory and hard-disk management. As you know, each program uses some of your computer's memory. Memory allocation is determined by how much the program needs and, of course, if the resource is available. When the application stops, the used blocks of memory should be freed. But this is not happening all the time. So, when a new programs requests memory to run, your computer will slow down because it will compete with other applications for the remaining resources.

The same situation appears when you remove files from your computer. They are not really erased. They remain on your hard-disk and affect other files that you want to read or write. It's the same principle as described above regarding memory usage. To avoid problems you should use at least once a month a hard-disk defragmenter, in order to clean remaining pieces of information.

Upgrading your computer - even after implementing all the methods suggested your computer does not speed Vista boot up, you might have to consider replacing some of your hard ware - may be the hard disk, video card etc. Just spending a few minutes to use the above methods can speed up my computer at ultra fast speeds! Click on the below link to get started with dependable registry cleaners to clean up your system.

The index is like the computer's table of contents. Every file has its own index, so the computer can locate whatever file you wish to show faster. If the index is gone, the computer won't be able to view the file, but the actual file itself resides somewhere in the computer's free space, waiting to be overwritten. The computer's ove.

Best Windows Server 2012 Hosting Recommendation

ASPHostPortal.com provides our customers with Plesk Panel, one of the most popular and stable control panels for Windows hosting, as free. You could also see the latest .NET framework, a crazy amount of functionality as well as Large disk space, bandwidth, MSSQL databases and more. All those give people the convenience to build up a powerful site in Windows server 2012. We offers Windows hosting starts from $5/month only. We also guarantees 30 days money back and guarantee 99.9% uptime. If you need a reliable affordable Windows server 2012 Hosting, we should be your best choice.


Windows Hosting - ASPHostPortal.com :: How to change DNS Servers in Windows 7

clock October 24, 2016 08:31 by author Armend

This article is for people to change their Windows 7 DNS settings.  It will also override the DNS settings sent through DHCP so it is acceptable for most users of Windows 7.  You will need admin rights in order to preform some of these steps.
1. Choose two or more IP addresses from here, then open the Control Panel and click on Network and Sharing Center as seen below.

2. Click “Change Adapter Settings” in the left bar.

3. Right click on your network device and choose properties. In my case this was Local Area Connection, but it could also be a wireless adapter or named something else.


4.  Choose the IP version you would like to set the DNS settings for and click “properties”.  I will be choosing IPv4 for this guide, but the steps are basically identical for IPv6.

5.  In the window that pops up, click “Advanced” in the bottom right of the windows

6. Click the “DNS” tab at the top.

7. Click Add and then type a Tier2 server IP in the box that pops up and click add again.
You may repeat the add step as many times as you want to add more DNS servers. DNS servers added to the list are being tried consecutively after a short timeout when one or more of them are offline.
8. Click OK until you are out of dialogue boxes! 

Best Windows Server 2012 Hosting Recommendation

ASPHostPortal.com provides our customers with Plesk Panel, one of the most popular and stable control panels for Windows hosting, as free. You could also see the latest .NET framework, a crazy amount of functionality as well as Large disk space, bandwidth, MSSQL databases and more. All those give people the convenience to build up a powerful site in Windows server 2012. We offers Windows hosting starts from $5/month only. We also guarantees 30 days money back and guarantee 99.9% uptime. If you need a reliable affordable Windows server 2012 Hosting, we should be your best choice.


Windows Hosting - ASPHostPortal.com :: Demystifying the Windows Registry

clock October 10, 2016 19:40 by author Armend

Demystifying the Windows Registry

The registry is a key component of the Windows operating system. It is so important, that without it, Windows would not even run. When a new piece of hardware or software is installed in Windows, it stores its configuration into the Registry. This allows Windows to retrieve that information at later dates such as when it is starting up. As Windows starts it will read the configuration in the registry and know what drivers need to be loaded, what settings to be applied, and what resources need to be allocated in order for this equipment to work. Because this information is stored in the Registry on your hard drive, Windows has this information available each time it boots up.

The registry, though, is not only for operating system settings. User preferences and application settings are stored in the Registry as well. When you change your desktop background or screen saver, these details are stored in the Registry. Now when you shutdown Windows and start it up again at a later date, your preferences are available and loaded automatically. Application settings such as what directory you would like to download files to or what your default font is in a word processor are stored here as well. As you can see the Registry contains information that is not only vital to the use of the operating system, but also essential in allowing you to customize Windows to your particular tastes.

Structure of the Registry

The Registry is a hierarchical structure similar to what you see when looking at a directory/file tree on your computer. You have a main key, or Hive, with Keys, Subkeys and then Values. Each of these are discussed below:
Hives - Hives are the top most portions of the hierarchical data tree with each Hive containing a certain category of information. For example one Hive may contain the configuration that applies to the particular user logged on, while another Hive will contain information about the hardware installed in the computer. Depending on the version Windows that you are running there will be 5 or 6 different hives. Below we have outlined the 6 possible hives:

  • HKEY_CURRENT_USER (HKCU) -
        This Hive contains the preferences and configuration for the particular user who is currently logged in. If a different user is logged onto the same machine, then the information in this Hive would change corresponding to that particular user's configuration.
  • HKEY_LOCAL_MACHINE (HKLM) -
        This Hive contains the configuration for the actual computer. The information in this Hive remains the same regardless of the user currently logged on.
  • HKEY_CLASSES_ROOT (HKCR) -
        This Hive contains the information which pertains to the core user interface such as file associations and shortcuts.
  • HKEY_USERS (HKU) -
        This Hive contains the user information for all the users that have ever logged onto this computer.
  • HKEY_CURRENT_CONFIG (HKCC) -
        This Hive contains the information about current hardware configuration. This Hive is linked to the HKLM Hive.
  • HKEY_DYN_DATA (HKDD) -
    This Hive is found only on Windows 95/98/ME. It contains information about hardware Plug and Play. This Hive is linked to the HKLM Hive.
  • Keys - Keys are an organizational unit in the Registry. Keys are containers that can either contain values or further subkeys. Subkeys themselves, can contain further subkeys. Keys are similar to folders in that they can contain further subkeys or the file, or what we call values in the Registry.
  • Values - Values contain the actual data that is being stored in a Key or a Subkey. There are quite a few different types of values that can be stored in the Registry, but the most common that you will see are binary, strings, and DWORD values.
    When visualizing the Registry you should look at the Hives, Keys, and Subkeys as the path that you will need to navigate in order to reach the final stored information which is the Value.

An example Registry key can be seen below. This Registry key controls what your initial start page will be when using Internet Explorer.

HKEY_CURRENT_USER\Software\Microsoft\Internet Explorer\Main\\Start Page

When we break this Key down to its components we can see the following:

HKEY_CURRENT_USER is the Hive that this key is associated with.
Software is a Key
Microsoft - This is a Subkey
Internet Explorer - This is a Subkey
Main - This is a Subkey
Start Page - This is the Value that the actual data is stored in. For this particular Value, the data will be the start page that you want Internet Explorer to use.

Where the Registry is stored

The Registry itself is stored on your computer in certain files. Below we detail what files and their locations are used to store the Registry based upon the particular version of Windows.
For Windows NT 4.0, Windows 2000, Windows XP, and Windows Server 2003, the Registry files are stored in the following directories:
%SYSTEMROOT%\System32\Config
%USERPROFILE%\ntuser.dat

The names for the registry files are:

Sam, Sam.log, Sam.sav
Security, Security.log, Security.sav
Software, Software.log, Software.sav
System, System.alt, System.log, System.sav
System, System.alt, System.log, System.sav, Ntuser.dat, Ntuser.dat.log
Default, Default.log, Default.sav
For Windows 98, the registry files are named User.dat and System.dat and are stored in the C:\Windows directory.
For Windows Millennium Edition, the registry files are named Classes.dat, User.dat, and System.dat and are stored in the C:\Windows directory.

How to edit the Registry

In order to modify values in the Registry you need to use a program called a Registry Editor. Windows comes with a program called regedit.exe or otherwise known as Registry Editor. To launch this program you should click on the Start button, then click on the Run option, and in the field type regedit.exe and press the OK button. This will launch the Registry Editor.
When you open Registry Editor you will see two panes. The left pane is your navigation pane. By default it will list all the Hives with a + or - next to each one. You can click the + to expand the tree underneath that Hive revealing Keys and Subkeys. You would keep navigating the Subkeys until you reach the desired location and then click on it once to highlight it. Then you will see in the right pane a listing of the values associated with that key.
In the screenshow below you will see an image of the Registry Editor where I have navigated to the key:

HKEY_CURRENT_USER\Control Panel\Colors
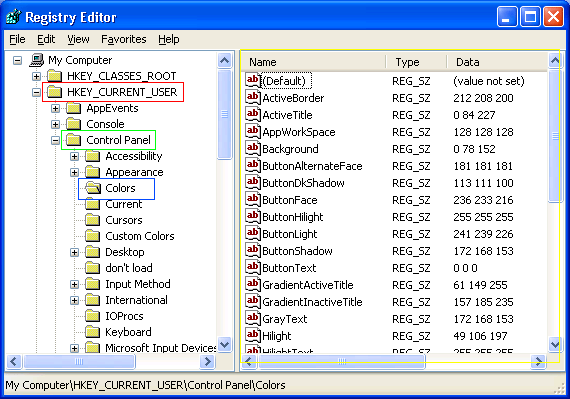
In Figure 1 above, the Hive that we are in is HKEY_CURRENT_USER. They Key is Control Panel and the Subkey is Colors. The right hand portion shows all the Values contained in the subkey Colors.
To modify a Value, you would double-click on the value name and a screen similar to Figure 2 below would appear.
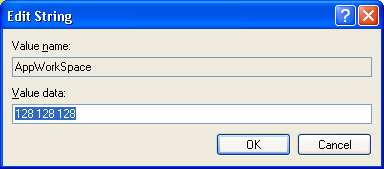
You then would type in the appropriate information into the Value data field and press the OK button.
To delete values, instead of double-clicking on a value name you would right-click on the value and then select Delete. This method can also be used to delete keys or subkeys. To add a value you click on the Edit menu option and then select New and pick the appropriate type.
It is also possible to export and import Registry values into your Registry. To export a particular Key or Subkey you would click once on the key you would like to export and then click on File and then Export. Then select a directory and filename to export the Registry key to. Likewise, you can also Import keys into the Registry by clicking on Import and then selecting the file that you had exported previously.

Backing up the Registry

Viruses, Spyware, and other Malware can cause corruption and damage to the Registry. With this in mind, it is important to backup your registry so that you know you have a clean copy stored safely on your hard drive in case of an emergency. Below we have outlined the steps to backup and restore your Registry under the various versions of Windows.

Backing Up the Windows 95 Registry

  • Reboot your computer and when you see "Starting Windows 95" press the F8 key. Then choose Safe Mode Command Prompt Only from the startup menu and press enter.
  • At the command prompt type the following lines, pressing ENTER on your keyboard after each line:
  • cd \windows

attrib -r -h -s system.dat
attrib -r -h -s user.dat
copy system.dat *.bak
copy user.dat *.bak

WARNING: These steps make the assumption that you do not have any files named system.bak or user.bak. If you do have files with these names, change the extension in the steps above to something else.

  • Restart your computer.

Restoring the Windows 95 Registry

  • Reboot your computer and when you see "Starting Windows 95" press the F8 key. Then choose Safe Mode Command Prompt Only from the startup menu and press enter.
  • At the command prompt type the following lines, pressing ENTER on your keyboard after each line:

    cd windows
    attrib -r -h -s system.dat
    attrib -r -h -s system.da0
    attrib -r -h -s user.dat
    attrib -r -h -s user.da0
    ren system.dat system.daa
    ren system.da0 system.da1
    ren user.dat user.daa
    ren user.da0 user.da1
    copy system.bak system.dat
    copy user.bak user.dat

WARNING : This will restore the previous backup that you had made. If you had chosen an extension other than .bak when you had backed up the Registry previously, then substitute that extension above.

Restart your computer.

Backing Up the Windows 98/ME Registry

  • Click the Start button, then click Run.
  • Type scanregw in the field and press the OK button.
  • When the program has finished scanning the Registry for errors it will ask if you would like to back up the Registry.
  • Click the Yes prompt and the program will create the backup.
  • When it is completed, press the OK button.

Restoring the Windows 98/ME Registry

  • For Win98, reboot your computer and press and hold the CTRL button. Then choose Safe Mode Command Prompt Only from the startup menu and press enter. For Windows ME, start your computer with a startup disk and select Start Computer without CD-ROM Support.
  • You will now be at a command prompt. Type c:\windows\command\scanreg /restore and press enter on your keyboard. A screen will will appear with a list of the previous Registry backups sorted by date. Using the arrow keys, select the Registry backup you would like to restore and press enter. A known previously working Registry backup will have the word Started next to the date.
  • Scanreg will now restore the Registry and check it for errors. When it is done you will receive confirmation and you should now press enter to reboot your computer. If you had booted your computer with a floppy, please remove the floppy first before rebooting.

Backing Up the Windows XP/2000/2003 Registry

  • Click on Start, then All Programs, then Accessories, then System Tools, and then click on Backup. If you do not see the Backup utility you will need to install it using your XP or 2003 CD.
  • When the program launches, if you are not in the wizard, select the Backup Wizard Option.
  • When the Wizard opens press the Next button.
  • Select "Only back up the System State Data". Keep pressing next until you see Finish.
  • Press the Finish button to start the Registry backup.
  • When it is completed you will see a report of the backup. You can then press the Close button and then exit the program.

Restoring the Windows XP/2000/2003 Registry

Option 1:

  • Click on Start, then All Programs, then Accessories, then System Tools, and then click on Backup. If you do not see the Backup utility you will need to install it using your XP or 2003 CD.
  • When the program launches, if you are not in the wizard, select the Backup Wizard Option.
  • When the Wizard opens press the Next button.
  • This screen will list all the known backups that were done previously. Select the System State backup that you would like restored.
  • Press the next button and then the Finish button.
  • When it is completed you will see a report of the backup. You can then press the Close button and then exit the program.

Option 2 (Only for XP and 2003):

  • Insert your Windows CD into your computer and reboot.
  • When it prompts you to "Press Any Key to Boot from CD", press any key.
  • When the screen appears that gives you the options to Setup, Repair or Quit, press R on your keyboard to enter repair mode.
  • At the next screen select the installation of windows you would like to work on. For most people there will be only one option.
  • When prompted enter your administrator password and press enter on your keyboard.
  • When you get the prompt, type cd repair to enter the directory where a Registry backups is stored.
  • Type the following lines, pressing enter on your keyboard after each line:

    copy default c:\windows\system32\config
    copy sam c:\windows\system32\config
    copy security c:\windows\system32\config
    copy software c:\windows\system32\config
    copy system c:\windows\system32\config

NOTE: If it prompts you to overwrite the existing files, select Y for yes.

  •     When you are finished, type exit and press enter.
  •     Remove your Windows CD and reboot.

Conclusion

Understanding and knowing how to backup the Registry is an important part of keeping your computer secure and running efficiently. It must be stressed that modifying any portion of the Registry should be done with the utmost care as incorrect usage of the Registry could make your computer inoperable.

Best Windows Server 2012 Hosting Recommendation

ASPHostPortal.com provides our customers with Plesk Panel, one of the most popular and stable control panels for Windows hosting, as free. You could also see the latest .NET framework, a crazy amount of functionality as well as Large disk space, bandwidth, MSSQL databases and more. All those give people the convenience to build up a powerful site in Windows server 2012. We offers Windows hosting starts from $5/month only. We also guarantees 30 days money back and guarantee 99.9% uptime. If you need a reliable affordable Windows server 2012 Hosting, we should be your best choice.


Windows Hosting - ASPHostPortal.com :: Easy tips to protect your Windows from hackers and malware

clock September 26, 2016 20:20 by author Armend

Easy tips to protect your WIndows PC from hackers and malware

In the news recently there have been some high-profile security scares for computer users. Common sense alone isn’t enough to protect your Windows PC from malware – malicious software that disrupts your computer’s operations or gathers sensitive information about your online behaviour.
Hackers can attack your PC in so many different ways that employing several layers of anti-malware protection is the only way to keep your PC malware-free when it’s online.
Here are seven steps to protect your computer from Malware. Check out the video above to find out more.

Tip 1: Install, update and use anti-virus software

Installing antivirus software may sound like an obvious first step to protect against malware, but not everyone bothers to do it. With so many options now available, though, there really is no excuse. Microsoft offers its own free download in the form of Microsoft Security Essentials for Windows Vista and 7, while Windows 8/8.1 has Microsoft Defender built in.
Once installed, it’s vital to regularly update your anti-malware software’s database and run system scans at least once a month.

Tip 2: Keep Windows up to date

Hackers often discover new ways to bypass Windows’ built-in security features, which is why Microsoft issues small operating system updates every Tuesday and larger ‘service pack’ updates once or twice a year. These will be downloaded and installed automatically by Windows update, but only if this feature is properly configured.
To check that it’s working normally, type Windows Update in the Start menu search box in Windows Vista/7, or at the Start screen in Windows 8/8.1. Look on the left of the Windows Update window and click Change settings and use the drop-down list to check that Install updates automatically is selected - anything other than this risks a crucial update being missed.

Tip 3: Turn on the Windows firewall

Windows has a built-in ‘firewall’ that protects your PC from unwanted attention via the internet. This software firewall is enabled by default and works alongside any hardware firewall that’s built into your home broadband router. Check its settings by typing “check firewall” in the Start menu search box or on the Windows 8 Start screen and choosing Check firewall status from the results.
Two green tick marks mean the firewall is working normally, else you’ll need to select Turn Windows Firewall on or off on the left of the window and enable one or both options that appear.

Tip 4: Use the latest version of your web browser

Web browsers are vital applications, but just like other software, they can contain bugs. Hackers are quick to capitalise on these and create bogus (or infect genuine) web sites with data designed to exploit them. Once a web browser has been compromised in this way, a hacker can monitor everything you type, including passwords to credit card numbers. That’s why it’s vital to use the latest version of your web browser - anything other than this may be a security risk.
Microsoft includes updates for Internet Explorer. Search for Windows Update and check its optional updates section to ensure you’re also using the latest version of the application - which is Internet Explorer 11, if you’re using Windows Vista, 7 or 8/8.1.

Google Chrome and Mozilla Firefox will also update themselves automatically, but don’t ignore their requests to restart the browser when such an update has been downloaded and is ready to be installed.
Emails that appear to be from a recognisable online service asking you to log into a site to confirm some personal details are always fake. These emails are usually caught by your email application’s spam filter, but if one does slip through and you click its link, your web browser should detect and block the site it takes you to. This does depend on your web browser being aware of the fraudulent site, though, which is another good reason to always use the most recent version.

Tip 6: Use the Windows Malicious Software Removal Tool

If you suspect your PC has succumbed to malware and your anti-malware software doesn’t detect it, there are two steps to take.
The first is to download and run the Microsoft Malicious Software Removal Tool from the Windows Download Centre. This will detect and remove specific types of malware and is very simple to use, although it isn’t a replacement for a full anti-malware application.

Tip 7: Still infected? Use a boot CD.

Some malware can hide within Windows and make itself difficult to detect and remove. If your own anti-malware software and the Windows Malicious Software Removal Tool fail to shift it, you’ll need to download and burn a free anti-malware boot CD – refer to your computer’s manuals for instructions on how to boot from a CD as the process varies from manufacturer to manufacturer.

ASPHostPortal.com

ASPHostPortal.com provides our customers with Plesk Panel, one of the most popular and stable control panels for Windows hosting, as free. You could also see the latest .NET framework, a crazy amount of functionality as well as Large disk space, bandwidth, MSSQL databases and more. All those give people the convenience to build up a powerful site in Windows server 2008. We offers Windows hosting starts from $5/month only. We also guarantees 30 days money back and guarantee 99.9% uptime. If you need a reliable affordable Windows server 2008 Hosting, we should be your best choice.


Windows Hosting - ASPHostPortal.com :: How to find the License Agreement for the Installed version of Windows

clock September 19, 2016 19:31 by author Armend

How to find the License Agreement for the Installed version of Windows

When you install Windows, you are shown the Windows license agreement that provides all the legal language about what you can and cannot do with Windows and the responsibilities of Microsoft. Recently I wanted to read the license agreement again for Windows and I surprisingly found it difficult to find it.
With that said, I put together this guide to show how you can find the license agreements for all editions of your currently installed Windows version and read it.
The first step is to identify the version of Windows currently installed on your computer. If you already know what version of Windows you are using, you can skip here. Otherwise, in Windows 7 and Windows 8, you can left-click on the Start Menu, then right-click on Computer, and then select Properties. For Windows 10, right-click on the Start Menu and then left-click on the System option.
You will now be shown the System control panel that provides information on what version of Windows you are running as shown below.

As you can see from the above image, I have Windows 7 Ultimate installed on my computer.
Now that we know what version of Windows we are running we can open the folder that contains all of the license agreements for this version of Windows. To do this, click on the Windows (Windows Key) key, and while holding it down, click on the R key to open the Run dialog as shown below.

When the Run dialog box opens, you want to paste the following into the Open: field so that it looks like the image above

  •     c:\windows\system32\en-US\Licenses\_Default

When ready, press the OK button and a folder will open that shows individual subfolders for every edition of the Windows version installed on your computer. Each of these folders contain the respective license agreement for that version of Windows.


Scroll through the list of folders and double-click on the one that corresponds to the edition of Windows that is installed on your computer. When the folder opens, it will contain a single file called license.rtf. This file is the license agreement for your version of Windows and you can double-click on it to view it in Wordpad or Word, if it is installed.


You can now read the agreement, print it, or email it as needed.

ASPHostPortal.com

ASPHostPortal.com provides our customers with Plesk Panel, one of the most popular and stable control panels for Windows hosting, as free. You could also see the latest .NET framework, a crazy amount of functionality as well as Large disk space, bandwidth, MSSQL databases and more. All those give people the convenience to build up a powerful site in Windows server 2008. We offers Windows hosting starts from $5/month only. We also guarantees 30 days money back and guarantee 99.9% uptime. If you need a reliable affordable Windows server 2008 Hosting, we should be your best choice.


About ASPHostPortal.com

We’re a company that works differently to most. Value is what we output and help our customers achieve, not how much money we put in the bank. It’s not because we are altruistic. It’s based on an even simpler principle. "Do good things, and good things will come to you".

Success for us is something that is continually experienced, not something that is reached. For us it is all about the experience – more than the journey. Life is a continual experience. We see the Internet as being an incredible amplifier to the experience of life for all of us. It can help humanity come together to explode in knowledge exploration and discussion. It is continual enlightenment of new ideas, experiences, and passions

 photo ahp banner aspnet-01_zps87l92lcl.png

Author Link

Corporate Address (Location)

ASPHostPortal
170 W 56th Street, Suite 121
New York, NY 10019
United States

Sign in